Monday 31 December 2018

Place Card


I was having company over Christmas and decided to try making Place Cards. Here is what I made:


I started with a piece of patterned paper from my stash which measured 4" x 6.5". Using the Scor-Pal, I scored it at 2.5" and 4" along the 6.5" side. I folded along the score lines to create a triangle, with the opening at the top.

I stamped the partridge and the sentiment, both from Gina K Designs Fruit of the Season stamp set, onto some white cardstock with Gina K Designs Prickly Pear ink. Using the Gina K Designs 
Decorative Label Set dies, I cut out the sentiment and the place where the name goes. I used the coordinating die to cut out the partridge.

To assemble the place card, I scored the label with the sentiment above the writing, added some Scor-Tape to the back of the label and attached it to the top. I wrote my name on the small label with a Bronze Metallic Sharpie marker, added it to the front and popped up the partridge with a foam square.

 I am entering this in the Scor-Pal More than One Score Challenge #55 December - Anything Goes Christmas and the Simon Says Stamp Wednesday Challenge - Anything Goes.

I wish everyone a Happy New Year and hope that 2019 brings you good health and happiness!

Saturday 29 December 2018

Gift Card Holder

I made this just before Christmas but I'm just getting around to posting it today. I needed a few gift card holders so I made ones like this. I am entering it in the Scor-Pal More than One Score Challenge #55 December - Anything Goes Christmas and the Simon Says Stamp Wednesday Challenge - Anything Goes.


These gift holders are quick and easy to make. Start with a piece of cardstock that measures 3 3/4" by 7 1/2", and score at 2 1/2" and 5".  Cut from the top of the 5" score line to the bottom of the right hand edge. You should end up with this:


Place some Scor-Tape along the very bottom of the right hand triangle and fold it over to create the pocket for the gift card. I used 1/8" tape so there was more room for the card. If you want more room, increase the height of the holder to 4". Add patterned paper to the inside and outside to decorate it.


To hold it closed, I made a belly band with ribbon and stamped a snowflake on a circle of cardstock. I attached it with a Glue Dot and also used a removable Glue Dot to hold the gift card in the holder. 

I used these supplies:
Gina K. Designs: Winter Cheer patterned paper pack
                             Christmas Pine ink
                             Sparkling Snowflake stamp set
Scor-Pal
Scor-Tape
ek tools 1 1/2” circle punch
Glue Dots
red cardstock, ribbon from my stash

Sunday 16 December 2018

Snow Globe

I had some pieces left from a die cut on a previous card and decided to make a card with them. You can see the previous card Here. I am entering it in the  StampTV Monthly Mix Challenge - Holiday in Black and White, the Simon Says Stamp Monday Challenge - Warm Winter Wishes and the Simon Says Stamp Wednesday challenge - Christmas.


I thought that the trees looked like they were covered with snow and decided to use a snow globe die, which I embossed by using a rubber mat. I glued the die cut pieces onto a black card base and laid the snow globe shape over them to see where I could place the snowflakes. I removed the snow globe, stamped the snowflakes with VersaMark ink and embossed them in white. I stamped the sentiment and attached the snow globe die. I added some Wink of Stella to the trees to give them a bit of sparkle.

I used the following supplies:
Gina K. Designs: Christmas Greenery, Sparkling Snowflake stamp sets 
Memento Tuxedo Black ink 
VersaMark ink 
Craftmania snow globe die
Clear Wink of Stella brush
Tombow MONO Multi liquid glue
From my stash: tree die, white embossing powder, white and black cardstock


Wise Men

I made another card for the StampTV Monthly Mix Challenge - Holiday in Black and White. I am also entering it in the Simon Says Stamp Monday Challenge - Warm Winter Wishes and the Simon Says Stamp Wednesday challenge - Christmas.


I bought this lovely die last year and haven't had a chance to use it yet. After cutting the die out of black cardstock, I glued it to some white cardstock. I stamped the star in black and clear embossed it to give it some shine. I needed something else to go on the top so I attached some ribbon, stamped the sentiment and popped it up with some foam squares. The whole panel was matted with black and attached to a white card base.

Gina K. Designs: Sparkling Snowflake, Sentimental Holiday stamp sets
                             Black 5/8” Gingham ribbon
Memento Tuxedo Black ink 
Scor-Pal Three Wise Men die

Tombow MONO Multi liquid glue
clear embossing powder, foam squares, white and black cardstock from my stash

Saturday 15 December 2018

Lovely Branches


I started by using a die to cut the trees out of a white piece of cardstock. I saved the pieces to use on another card. I layered the white piece onto a black piece of cardstock, so the black shows through the trees. I added a piece of patterned paper near the top and added the sentiment, which is heat embossed and matted with black, with some foam squares. I adhered all of this to a white card base.

I used the following supplies:
Gina K. Designs: Christmas Joy Stamp set
                             Petite Patterns patterned paper
Memento Tuxedo Black ink 
From my stash: tree die, clear embossing powder, white and black cardstock, foam squares

Sunday 9 December 2018

Christmas Wreath

I recently got a stamp set with lots of small images that are perfect for making a wreath. I am entering this card in the Mod Squad Challenge - Build a Wreath, the Kat Scrappiness Charity Blog Hop to Benefit Coffee Oasis and the Simon Says Stamp Christmas Card Day.


I started with a piece of white cardstock and used the Inkadinkado Stamping Gear to make the wreath. I stamped the two pieces of pine branch and then added the sprigs and flowers. I stamped the sentiment and matted the panel with red before attaching it to a white card base. I thought it needed a little something so I added a bunch of sequins in different colours and shapes.


I used the following supplies:

Gina K. Designs: Christmas Greenery stamp set
                            Christmas Pine, Red Velvet, Sandy Beach ink
                            White, Red Velvet cardstock 
Memento Tuxedo Black ink 
Inkadinkado Stamping Gear
sequins from my stash

Sunday 25 November 2018

Let it Snow

Simon Says Stamp has two challenges every week - one on Monday and one on Wednesday. This week, they are both about snow and cold so I made a card for both challenges: Monday - Let it Snow, and Wednesday - Baby, it's Cold Outside. I am also entering this in the StampTV Monthly Mix challenge - Monochromatic Christmas Card/Project.


This was a fairly easy card to make. I started with a piece of blue cardstock from my scrap pile, stamped the snowflakes with VersaMark ink and embossed them in white. I stamped the sentiment on some white cardstock and rounded the corners. I stamped the snowflake in blue, embossed it in clear and cut it out with the coordinating die. After attaching the snowflake layer to a white card base, I popped up the sentiment with foam squares and added the die cut snowflake.

Here are the supplies I used:
Gina K. Designs: Sparkling Snowflake stamp set and coordinating die
                            Blue Denim ink
VersaMark ink
blue, white cardstock; clear, white embossing powder; corner rounder; foam squares from my stash

Tuesday 13 November 2018

Birthday Grid Card

I had so much fun making the last card that I decided to make another one using the grid technique. I have a friend who has a birthday coming up, so I made this card for her. I am entering it in the Mod Squad Challenge - Modern Grid.


I started by stamping the flower and then drew the grid lines. I coloured the flower and a few of the squares. Then I stamped the small flowers in a few squares and stamped the sentiment near the bottom. I matted the layer with black and added it to a white card base.

I used these supplies:
Gina K. Designs: Especially for You, Happy Birthday to You, Where Flowers Bloom stamp sets
                            Amalgam, Bubblegum Pink, Dusty Rose, Innocent Pink ink
Spectrum Noir: Ultra Smooth Premium White cardstock
                         Alcohol Markers: PV1, PV2, PV3, PV4, CT4, MG3, PP1, AP1, BP1
American Craft precision pen 01 Black
black cardstock from my stash

Monday 12 November 2018

Snowflake Modern Grid

I made this card for two challenges: the Mod Squad Challenge - Modern Grid, and the StampTV Monthly Mix challenge - Monochromatic Christmas Card/Project. 


I stamped the snowflake and embossed it with a sparkly embossing powder. I decided to make my grid lines on a slant. I hope that's allowed! Once they were all drawn, I stamped a few small snowflakes in different colours of blue ink and attached the panel to a blue card base. I stamped the sentiment and matted it with blue cardstock before popping it up with some foam squares.

I used the following supplies: 
Gina K. Designs: Sparkling Snowflakes, Seasonal Sentiments, Christmas Joy stamp sets
                            Blue Denim, Powder Blue, Ocean Mist ink
                            White, Blue Denim cardstock 
Blue Staedtler triplus fineliner marker
sparkly embossing powder, foam squares from my stash

Monday 5 November 2018

Square Christmas Card

Gina K. Designs had a new release last week and there was a Release Party Challenge on StampTV - Square Up! We were to make a square card. There is also a monthly challenge on Stamp TV, and this month it is to make a Monochromatic Christmas Card/Project. I made this card to enter into both challenges. 


I decided to do a fairly simple design and dress it up with embossing. I used three different colours of embossing powder and mixed two of them together to give me the colour I wanted. After stamping a poinsettia with VersaMark ink, I spooned one colour on every second petal, one at a time, dumping the excess off each one, before moving on to the next. Then I covered the whole flower with the mixed colour and heated it. I repeated the process until the whole piece was covered. I then matted it with red before attaching it to a white card base.

I stamped the sentiment on a small piece of white cardstock and popped it up with a piece of foam tape.

I used the following supplies:
Gina K. Designs: Merry & Bright Stamp set
                            Cherry Red ink
                            Red Velvet cardstock
VersaMark ink
white cardstock, embossing powder, foam tape from my stash

Monday 29 October 2018

Triangular Box

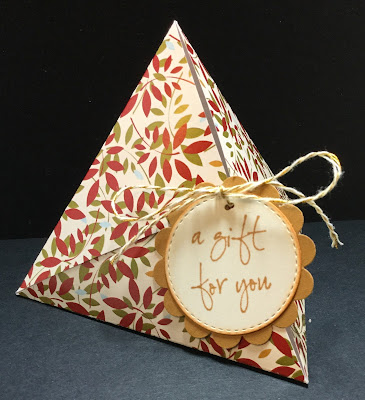
I was looking on Pinterest for some cute treat boxes and found this one. I adjusted the size slightly so I could use a 6" x 6" piece of patterned paper.


I liked the pattern for this box because it doesn't require any cutting, and comes together very quickly. To make the box, start with a piece of patterned paper 4 1/4" x 6". I used a piece from the Gina K. Designs - Give Thanks pack. With the 6" side at the top of your Scor-Pal, score at 3". On the 4 1/4" side, make a mark at 2 1/8" on each end. Score from the mark to the end of the 3" score line on each side. Repeat on the other end and fold on all the score lines. You should end up with something like this:


With the 6" side on top, bring the two corners together, overlap slightly and glue the tips together. Repeat for the other side. When dry, punch a small hole in each side. I used a 1/8" punch.


Fill with your goodies and add a tag. To make the tag, I stamped the sentiment (A Gift for You stamp set), with Honey Mustard ink, onto a piece of ivory cardstock, die cut it with a Cottage Cutz Stitched Circle die and sponged the edge with Honey Mustard. Using some Scor-Tape, I matted it with some Honey Mustard cardstock, punched with a 1 3/4" scalloped circle punch. I used some baker's twine to tie the tag onto the box. All of the stamps, ink and cardstock are from Gina K. Designs.


Thanks for stopping by, and I hope you get a chance to make this easy box.


Saturday 13 October 2018

Gift Bag

I made this for a friend's birthday gift and am entering it in the following challenges: StampTV Monthly Mix - Anything other than a card; Scor-Pal More than one Score #53 - Fall/Harvest/Halloween; Simon Says Stamp Wednesday Challenge - Anything But a Card.


I started with a 12" x 12" piece of cream coloured cardstock and stamped the leaves randomly. 

To create the bag - Using your Scor-Pal, score at 2", 5 1/2", 7 1/2" and 11". Turn it a quarter turn and score at 1" and 10". Fold along all the score lines. With the 1" and 10" score lines at the top and bottom, cut from the bottom up to the 10" line along the four vertical score lines. Along the right hand side, cut off the bottom and top sections. Along the top, cut off the left 3 sections, leaving one section intact. Round off the corners of this top section. You should have something that looks like this (I forgot to round off the corners before I took the picture):


Put Scor-Tape along the tab at the right and make the square bag. Fold up the bottom tabs and tape together. Pinch the top sides together and fold the top flap over. Using a hole punch, punch two holes near the top, thread the twine through and form a bow.

To finish it off, I added a sentiment on a scalloped circle matted with a larger circle.

I used the following supplies:
Gina K. Designs: Skeleton Leaves and Holiday Frame Fillers Stamp sets
                            Wild Dandelion, Prickly Pear, Red Velvet, Dark Sage ink
Scor-Pal, Scor-Tape
2 inch circle punch, 1 3/4 inch scalloped circle punch, cardstock, 1/8 inch hole punch, corner                            rounder, baker’s twine from my stash

Monday 8 October 2018

Inching Along

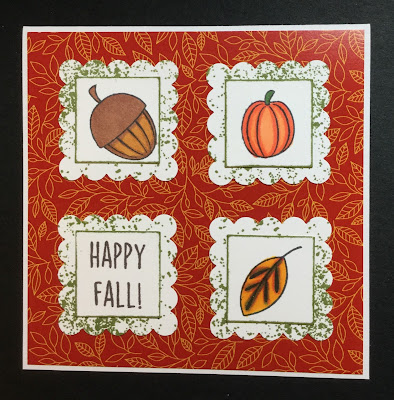
I made this card for the Mod Squad Challenge Blog. This week, the challenge is called Inching Along. We have to use at least one Inchie, an image that is an inch square, as our focal image. Here is what I came up with.


I didn't have a lot of time to make this card, so I decided to keep it fairly simple. I started by stamping the images with Memento ink, coloured them with alcohol markers and punched them out with a 1" square punch. I stamped the sentiment with Charcoal Brown and punched it out as well. I ran the edges of the squares along the ink pad to add some colour.

I punched out 4 scalloped squares and stamped them with a splatter stamp before attaching the inchies to them. I covered the front of a 4" square card with some patterned paper and then adhered the scalloped squares.

I used the following supplies:
Gina K. Designs: Give Thanks, Rose Peonies Stamp sets
                            Give Thanks patterned paper pack
                            Fresh Asparagus, Charcoal Brown ink
Memento Tuxedo Black ink 
Spectrum Noir: Ultra Smooth Premium White cardstock
                          Alcohol markers: EB4, GY5, OR1, OR2, OR3, GB4, DG3, DR5
1” square punch
1 1/2” scalloped square punch
glue dot runner


Sunday 30 September 2018

Emerging Flowers

There was a new Gina K. Designs release last week and there is a release challenge on StampTV called Emerging Images. We are to use the Emboss Resist technique to make our images emerge from the cardstock. You can have a look at the new products Here. I am also entering this in the Simon Says Stamp Wednesday challenge - Anything Goes.


I started with a piece of white cardstock and stamped the sentiment in the middle. Then I stamped the flowers and leaves with VersaMark and embossed them in white. Using a sponge dauber, I inked over the images to show the lines of the stamps and then used a paper towel to wipe off any ink that collected on the embossed areas.

I matted the front panel and attached this to a white card base.

The emboss resist technique is one of my favourites and there are several variations that I have tried.

I used the following supplies:
Gina K. Designs: Rose Peonies stamp set
                            Ink: Tangerine Twist, Sweet Mango, Fresh Asparagus, Dark Chocolate 
                            White, Sweet Mango cardstock
VersaMark ink
white embossing powder, tape runner, sponge dauber from my stash


Saturday 29 September 2018

Clean and Simple Gate Fold Card

I'm starting on my October birthday cards, so I thought I would make a gate fold card and enter it in the Scor-Pal More than One Score challenge #52 - Clean and Simple.  I am also entering it in the Simon Says Stamp Wednesday Challenge - Anything Goes.


I was at the dollar store and I found this sheer printed fabric roll with these pretty gold leaves. It's hard to tell in the picture, but the background of the fabric is red. 

I scored at 2 1/4 inches from each side of a 4 1/4" x 8 1/2" piece of white cardstock. I knew that any glue or tape would show through the sheer fabric, so I used a sheet of Scor-Tape Adhesive. It comes in 6"x6" sheets, so it would cover the front of the card without having any seams.

I thought that some gold foil would pair with the gold leaves, so I used a foiling element from the Gina K. Designs StampTV kit - Made with Love for my sentiment. I foiled it with Gold Therm O Web deco foil and cut it out with a Cottage Cutz Stitched Circle die. I cut a piece of red cardstock with a slightly bigger die and used Scor-Tape to adhere the sentiment onto the red circle and then onto the card front.

It's hard to believe that we're at the end of September already. The leaves are starting to turn here so it won't be long before we're raking!


Wednesday 26 September 2018

Clean and Simple card

Each month on the Scor-Pal blog, there is a challenge. We have to use more than one score on our project and this month the theme is Clean and Simple.


I decided to score several times along the top and left side to make a frame. I scored from the back so that the lines come forward and can be felt from the front. After stamping and embossing in clear, I coloured the image with water based markers. I also embossed the sentiment in clear.

This was a quick card to make and now I have a Thanksgiving card made. It is coming fairly quickly for those of us in Canada, since it's the second Monday in October.

Supplies used:
Scor Pal
Stampin’ Up! Always Thankful Stamp set
VersaFine Smokey Gray ink
Crayola markers
clear embossing powder, white cardstock from my stash


Monday 24 September 2018

Altenew Inspiration Challenge

There is an inspiration challenge on the Altenew blog every month. This month, we were given the following picture for inspiration:


Here is the card I came up with:


I used the colours for my inspiration. I stamped the layered flower 3 times and fussy cut them. I did the same with the leaves.

For the background, I scribbled on an acrylic block with some watercolour markers. I spritzed it with water and then stamped it onto white cardstock. Once it was dry, I matted it with some purple cardstock, added it to a white card base and taped the flowers and leaves onto the front.

I am also entering this in the STAMPtember Altenew limited edition challenge.

Supplies used:
Altenew Beautiful Day stamp set
Gina K. Designs ink: Bubblegum Pink, Passionate Pink, Wild Lilac, Jelly Bean Green, Grass Green 
markers, cardstock, tape runner from my stash


Friday 21 September 2018

Another Autumn Birthday

So this is the third birthday card I have made for a male relative in September! It is a busy month as it's also my birthday and my parents' anniversary month. I am entering this in the StampTV Monthly Mix - Autumn is in the Air and the Simon Says Stamp STAMPtember exclusive Gina K. Designs release.


The leaves are starting to turn and they inspired me to go with these colours. I love this large, leafy stamp. I inked it up with two colours and stamped it twice toward the top of a piece of white cardstock and twice toward the bottom.

I stamped the sentiment on a strip of white cardstock and heat embossed it in clear. After sponging the edges, I attached it to the card front with a couple of brads. I then matted it with green before adhering it to a white card base.

The weather is finally cooling off, although we are supposed to have rain and high winds tomorrow. I guess it's appropriate for the first day of Autumn!

Supplies used:
Gina K. Designs: Layered Daisies, Massive Messages stamp sets
                             Ink: Sweet Corn, Tangerine Twist, Red Hot, Fresh Asparagus, Warm Cocoa
                             White, Fresh Asparagus cardstock
brads, clear embossing powder, sponge dauber, tape runner from my stash

Tuesday 18 September 2018

Foiled Autumn Card

I was playing around with foil and decided to make another card for the StampTV Monthly Mix challenge - Autumn is in the Air. I am also entering this in the Simon Says Stamp Exclusive Gina K. Designs release challenge and the Simon Says Stamp Wednesday challenge - Pop it Up


I bought a laser printer with my birthday money and was eager to try foiling with it. I stamped the flowers, copied them with the laser printer and then foiled them in green and gold with my laminator. After stamping them with the solid stamp, I fussy cut them and set them aside.

I also foiled the striped background from the Petite Patterns paper pack in gold, matted it with Honey Mustard cardstock and attached it to a white card base.

I stamped the sentiment, die cut it, sponged around the edge and popped it up with foam squares on the background. I added the large flower with tape and popped up the smaller flowers. 

I used the following supplies:
Gina K. Designs: Where Flowers Bloom Stamp n Foil stamp set, Sending Love stamp set
                             Ink: Prickly Pear, Honey Mustard, Key Lime
                             Decorative Label die set
                             White, Honey Mustard cardstock 
                             Petite Patterns pure luxury paper pack
Gold Therm O Web foil
laser printer, laminator
sponge dauber, foam squares, green foil, adhesive tape from my stash


Monday 10 September 2018

Acrylic Block Stamping

The challenge this week for the Mod Squad is to use an acrylic block to stamp the background. I am also entering this in the StampTV Monthly Mix challenge - Autumn is in the Air, the Simon Says Stamp Exclusive Gina K. giveaway and the Simon Says Stamp Wednesday challenge - Stamp It for STAMPtember.


This was rather fun to do. I took an acrylic block, stamped some ink on it with ink cubes and spritzed it with water. Then I turned it over and stamped it on a piece of photo paper. I had a bit too much water so it made a few splatters around the block. I let this dry completely and stamped the leaves and sentiment.

I matted it with green and adhered it to a white card base. I thought about adding some more splatters but didn't want to ruin what I had, so I decided to leave it alone!

I used the following supplies:
Gina K. Designs: Stamp n Foil Where Flowers Bloom Stamp set, Birthday Blessings Stamp set
                             Ink: Coral Reef, Tangerine Twist, Wild Dandelion, Grass Green, Fresh

                                        Asparagus, Honey Mustard and Warm Cocoa
                             Fresh Asparagus cardstock
water spritzer, white cardstock, photo paper from my stash

Saturday 8 September 2018

Autumn Birthday Card

This month, the challenge on StampTV is Autumn is in the Air. We are to make a card or project with colours that remind us of autumn. I am also entering this in the Simon Says Stamp Wednesday challenge - Stamp it for Stamptember and the Simon Says Stamp Exclusive Gina K. release giveaway.


I needed a birthday card for my nephew and this was a fairly quick card to make. I cut a circle out of the Fresh Asparagus cardstock and then cut a smaller one out of the Sweet Corn cardstock. I stamped the sentiment on a piece of Honey Mustard cardstock and embossed it with clear embossing powder.

On the Fresh Asparagus piece, I stamped the leaves in Fresh Asparagus ink and clear embossed them. Then I layered all of the pieces together and attached them to a white card base.

Supplies used:
Gina K. Designs: Give Thanks, Made with Love Stamp sets
                            Fresh Asparagus, Dark Chocolate ink
                            Fresh Asparagus, Sweet Corn, Honey Mustard cardstock
Creative Memories circle cutting system
clear embossing powder, white cardstock from my stash

Sunday 2 September 2018

Traditional Christmas Card

There was a new release from Gina K. Designs last week and the Release Challenge is to make a Christmas card using the traditional red and green colours.


I thought the design on this patterned paper looked like poinsettias, so I decided to stamp some poinsettias for a background. I inked up the stamp with Cherry Red ink and then inked up just the outer part with Red Velvet. 

I trimmed a piece of patterned paper, added it to the card front and adhered this to a white card base.  Then I stamped the sentiment, embossed it in clear and added it to a piece of green cardstock. I popped it up with some foam squares and then added some yellow Stickles to the center of the poinsettias.

Well, that's one more Christmas card made. It's hard to believe it's September already and Christmas will be here before we know it.

I used the following supplies:
Gina K. Designs: Merry & Bright, Christmas Joy stamp sets
                            Cherry Red, Red Velvet, Grass Green ink
                            Floral Essentials patterned paper pack
                            White, Grass Green cardstock
Yellow Stickles
clear embossing powder, tape runner, foam squares from my stash

Monday 20 August 2018

Popped Up Flowers

I needed a birthday card this week, so I thought I would pop up some of the elements so it would qualify for the StampTV Monthly Mix challenge - Pop It Up.


I'm not sure this is a great picture! I wanted to show the foiled background but it makes it hard to see the other details.

I foiled the background using gold foil and one of the sheets from the Swirls & Flourishes Foil-Mates. I love the sparkle and shine! I attached this to a card base.

I stamped the sentiment, cut it out with one of the Decorative Label dies and adhered it to the middle of the background. Then I stamped the flowers and leaves and cut them out with the coordinating dies. I coloured them with alcohol markers and popped them up with foam squares.

Using foil makes a quick background and you can make up some extra and have them on hand for a fast and elegant card.

Supplies used:
Gina K. Designs: Rose Peonies Stamp set and coordinating dies
                            Swirls & Flourishes Foil-Mates
                            Decorative Label die set
Therm O Web Gold deco foil
Memento Tuxedo Black ink 
Spectrum Noir: Alcohol markers: DR6, DR3, CR7, CT3, AG4, AG2
                         Ultra Smooth Premium White cardstock
foam squares, adhesive tape from my stash

Sunday 5 August 2018

Popped Up Shaped Card

I made this card for a couple of challenges: Mod Squad Challenge - Getting in Shape; and StampTV Monthly Mix Challenge - Pop It Up.


To satisfy the requirements for both challenges, I made a shaped card that had popped up elements. I made the shape using the Creative Memories cutting system. I cut out two white shapes and then made the two purple layers a bit bigger. I embossed one of the white shapes with an embossing folder and adhered the white layers onto the purple layers.

I stamped the flowers and leaves and cut them out with the coordinating dies. I attached them onto the top layer using foam squares of different thicknesses to give a variety of pop up dimension.

I scored one inch down from the top of the back layer and attached the front layer to the back. I didn't put a sentiment on the front, so I can use it for any occasion. 

Thanks for having a look!

I used these supplies:
Gina K. Designs: Layered Daisies Stamp set and coordinating dies
                            Lovely Lavender, Wild Lilac, Wild Dandelion, Lucky Clover ink
                            White layering weight cardstock
Creative Memories cutting system
Cuttlebug embossing folder
Foam squares, purple cardstock from my stash

Monday 23 July 2018

Grateful Heart

There was a new release on Thursday from Gina K. Designs. This card is for the release party challenge - Grateful Heart.  We have to use autumn colors or images and a sentiment of thanks or gratitude.


All products are from Gina K. Designs, unless otherwise stated. I started by stamping the sentiment in Dark Chocolate ink on a piece of Spectrum Noir Ultra Smooth Premium White cardstock. I stamped the flowers and leaves, also in Dark Chocolate, around the sentiment.  The stamps are from the Painted Autumn stamp set. I coloured in the flowers with Spectrum Noir alcohol markers, using OR3, GB5, GB6, and CT2. For the leaves, I used CG4 and CG2. I thought they looked a little bright and didn't have enough of a brown undertone so I went over the whole leaf with YG3.

I attached a piece of patterned paper from the Give Thanks pack. There are tiny leaves among the red and green that are blue and yellow. I used Ocean Mist ribbon to match the blue and a Honey Mustard mat to match the yellow. I adhered this to a white card base.

We are supposed to have a very humid week here, so I hope it doesn't get too hot. It already feels like 29C or 84F and it's only 9:00 in the morning. Oh well, summer goes by so fast so I guess I should enjoy it while it's here. Hope you have a great week!