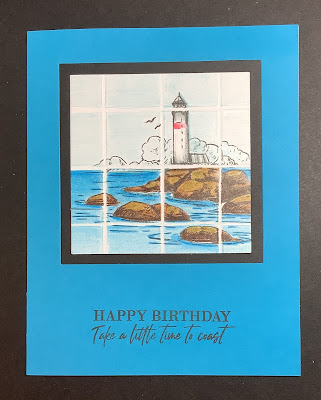
This month, I have an interesting technique using your Scor-Buddy, or Scor-Pal. It looks like you're seeing the scene through a gridded window.
To make this card, you will need:
Cardstock: 9 1/2" x 6" for card base
4 3/4" x 6" for front layer
smaller piece for inner layer
white piece larger than opening
dies to cut the openings (or a knife and ruler)
stamp image to cover opening - I used Gina K. Designs Time to Coast stamp set
colouring materials - I used coloured pencils
Take the white piece of cardstock and score every inch. Turn the cardstock 90 degrees and score every inch. You want to go over the score lines a few times to create deep score marks. This will help to keep the stamped image out of the score marks.
Carefully stamp your image, trying not to press down too hard, so the image doesn't stamp in the score marks. If you do get a bit of ink in the score marks, you can use a white marker to go over it, after the ink has dried. Then, colour the image, making sure not to colour in the score marks.
Cut the opening in the inside layer. You want this to be the smaller of your two dies. I used a 3 1/8" square die. Then cut the opening in your front layer. I used a 3 1/2" square die. I also stamped the sentiment, which was from the same set as the image.
Tape the inner panel to the back of the front panel. My black panel might have been a bit small, as it didn't give me much room for tape, but I used the 1/8" Scor-Tape which worked well.
Add tape to the back of the panels and center them over the coloured image. Attach this onto your card base.
To make 4 scored panels at once, use your Scor-Pal and an 8" x 10" piece of cardstock. Score at 1", 2", 3", 5", 6" and 7" along the 8" side, and on the 10" side, score at 1", 2", 3", 4", 6", 7", 8", and 9". Then cut at 4" on the 8" side and then cut each of these pieces in half, at 5".


