Friday 29 April 2016

Recycled Card

The StampTV MIUM challenge this week is an interesting one. We have to Get Trashy! We have to take something that we would normally throw out and use it on our card. I decided to use an empty toilet paper roll to make a gift card holder. I am also entering this in the Simon Says Stamp Wednesday challenge - Anything Goes.


I flattened the toilet paper roll and creased the edges well with my bone folder. I used some Sookwang tape to seal one end of the roll. I cut a piece of patterned paper and adhered it. I stamped the sentiment on a punched circle, matted it with a punched scalloped circle which was sponged around the edge and popped it up with some foam dots. For the insert, I used the tag punch on a strip of cardstock, sponged the edge and threaded it with some baker's twine. The gift card can be attached to the insert with a glue dot.

For the card base I used Versamark ink and stamped the flourish randomly. I attached the gift card holder and thought it needed something else, so I added a few rhinestones.

Here are the products I used:

Gina K. Designs: A Gift for You and Made with Love stamp sets
                             Made with Love patterned paper
                             Prickly Pear ink
ek tools 1 1/2" circle punch, 1 3/4" scalloped circle punch and tag punch
Memento Tuxedo Black ink
Versamark ink
Sookwang tape
Hampton Art adhesive foam dots
toilet paper roll, baker's twine and rhinestones from my stash

Sunday 24 April 2016

Emboss resist card

I am combining two challenges for this card. For the StampTV MIUM challenge we had to make a card that was a different size than 4 1/4" x 5 1/2". I chose a 4 1/4" square card. The other challenge I made the card for is the StampTV Kit Friday Funday challenge. We had to pick a video from StampTV that had one of our favourite techniques and make a card with that technique. I chose the Color on Color Emboss Resist video by Gina. You can see it here. I am also entering the Simon Says Stamp Wednesday challenge - Make it Girlie.


I started with a white piece of cardstock and sponged yellow, pink and purple ink randomly over the piece. I stamped the flowers with VersaMark ink and heat embossed them. Then I sponged blue ink over the entire area. I love that when you rub off the ink from the flowers the colours underneath show through. I matted it with black, added a piece of ribbon, and attached it to a blue card base.

I stamped two flowers onto a small piece of white cardstock and added the sentiment. I matted this with blue and popped it up with foam squares. 

I used the following products:

Gina K. Designs: Made with Love and Happy Birthday to You stamp sets
                             White, Black and Blue Lagoon cardstock
                             5/8" Black ribbon
ColorBox Pigment ink: Yellow, Pink, Purple
VersaMark ink
Recollections Clear embossing powder
foam squares from my stash


Friday 15 April 2016

Negative and Positive

This week on the Mod Squad Blog, we are asked to use a die cut and have both the negative and positive cuts on our card. I am also entering this in the new StampTV Release Party Challenge where we are asked to divide a panel on our card into separate pieces.


I was thinking about the positive and negative challenge and then when the Release Party challenge was to divide a panel into pieces, I thought of this technique. I forgot how many little pieces are in this die when I picked it out to use!

I die cut half of the butterfly from the black cardstock and carefully removed all of the little pieces. I taped the cardstock onto a piece of white cardstock, lining it up about halfway across. I laid the die cut back in the hole and used this as a template to place the little pieces back in position. I then flipped the die cut over, ran it through my Xyron machine to put adhesive on the back and adhered it on the white side, matching it up with the negative side. I matted this layer and adhered it to the card base with some foam squares.

I stamped the sentiment, die cut and matted it, and adhered it below the butterfly image.

Here are the products I used:

Gina K. Designs: Birthday Blessings stamp set; Black, White and Sweet Mango cardstock
Die-Versions 'Butterfly Kisses' Whispers die
Sizzix/ Tim Holtz Celebrate die
VersaFine Onyx Black ink
Xyron Create a Sticker machine
Zig 2 way glue pen
Tombow Mono Adhesive
Foam Squares from my stash

Monday 11 April 2016

Wax Paper Background

This week for the StampTV MIUM challenge we are to use the wax paper background technique. Gina showed a video this week with this technique. I am also entering this in the Mod Squad Blog challenge - What is in your background? and the Simon Says Stamp Wednesday challenge - Happy Birthday.


I tried a few embossing folders before I was happy with the background. Basically you take a piece of wax paper, crumple it up, smooth it out and run it through an embossing folder. Then you sandwich the wax paper between two pieces of cardstock and iron it to transfer the wax. Then you sponge ink over the background to reveal the pattern.

I stamped the cake image onto a die cut and matted it with a black scalloped oval. I attached this to the background with some foam squares, made a bow and attached it with a mini glue dot. I layered the background onto a piece of cardstock and attached it to a white card base.

Supplies used:

Gina K. Designs: Happy Birthday to You stamp set; Lipstick ink; Lipstick and White cardstock; die                                cut shapes from a grab bag
VersaFine Onyx Black ink
Alora Couture creations Circle Leaves embossing folder
Scrapbook Adhesives Black foam squares
Mini Glue Dot
ribbon from my stash
wax paper

Tuesday 5 April 2016

Sketch Challenge

I made this card for the StampTV MIUM Sketch Challenge and also for the Mod Squad Blog Challenge - Use Water.


This was the sketch we had to use.


I decided to turn the sketch sideways. I used water in the jar as my water element, and I thought the patterned paper looked a little like waves.

I stamped the jar, heat embossed it and then stamped the flowers. I cut out the image, coloured it and then sponged the edge of the circle. I stamped the 'for you' from the 'Especially for you' sentiment, cut it out and sponged the edges.

I cut some strips of patterned paper and cardstock, adhered them to a white card base, adhered the image and popped up the sentiment. I added some Wink of Stella to the water to make it shine a bit, but it's hard to see in the picture.

I used the following supplies:

Gina K. Designs: Birthday Blessings and Especially for you stamp sets
                             Delicate Essentials patterned paper pack
                             Grass Green and White cardstock
                             Grass Green ink
Memento Tuxedo Black ink
Recollections Clear embossing powder
Spectrum Noir alcohol markers: IB1, IB2, IB3, LG5, OR1, OR2, OR3, IG1, IG2
Wink of Stella Clear pen
Foam Squares
Tombow Mono adhesive


Sunday 3 April 2016

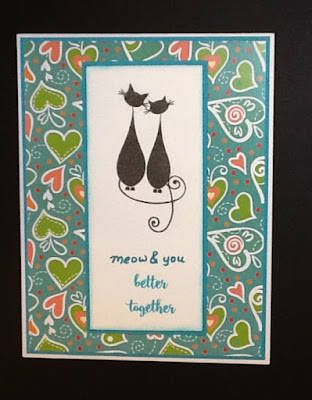
Meow & You

Today I made a card for the StampTV MIUM weekly challenge - Humor Me! I'm also entering it in the Simon Says Stamp Wednesday challenge - Anything Goes.


I chose a play on words using meow instead of me and using a picture of cats.

I took two different sentiments from the Better With You stamp set, used one word from each and masked off the rest of the sentiment to make "better together". I wrote the meow and you by hand and stamped the cats at the top. I matted it with Blue Lagoon, placed it on top of patterned paper which is also matted with Blue Lagoon and the whole thing was placed on a white card base.

Materials used:
Gina K. Designs: Better With You stamp set, Made with Love patterned paper set, Blue Lagoon ink                                and Blue Lagoon and White card stock.
VersaFine Onyx Black ink
Spectrum Noir alcohol marker BT5