Monday, 9 March 2020

Toned Down Neon

I decided to make another card for the Mod Squad Challenge - Bring on the Neon. We need to use neon or bright colours. I thought I would tone this one down a bit from the last one I made!


I used alcohol markers to colour my image. They don't show up quite as bright as my last card, but I think they are still vibrant.

I stamped the image and the sentiment on a piece of white cardstock. After colouring the image, I die cut it and also used the same die to cut it out of a piece of black cardstock. I taped the white cardstock to a white card base and filled in the hole with the die cut out of the black cardstock. Then I taped the black cardstock to the piece of white cardstock and fit the die cut image into the hole. If I haven't confused you by now, you get bonus points! Basically, I wanted the black layer to be smooth, so I had to cut a hole for it to fit into.

I coloured a few rhinestones with the same alcohol markers that I used for the flowers and added them to the card.

I used the following supplies:
Gina K. Designs Your Own Kind of Beautiful stamp set and die
              Jet Black Amalgam ink
Spectrum Noir alcohol markers FL2, FL3, BP6, AG2, GB6
              Ultra Smooth Premium White cardstock

Sunday, 8 March 2020

You Brighten My Day

This week on the Mod Squad Challenge, we are to Bring on the Neon. We have to use neon or very bright colours on our project.


I don't have any neon ink, but I thought these alcohol markers were pretty bright. I coloured with the markers through a stencil to make the background. I layered it with black and added it to a white card base.

I used the dies to cut out the flowers and leaves, coloured them with the markers and stamped the details in black, using my MISTI. Using foam tape, I attached them to a black die cut oval.

For the sentiment, I stamped it in VersaMark and heat embossed it in white. I attached this with some more foam tape.

I used the following supplies:
Gina K. Designs Electro Pop Flowers stamp sets and coordinating dies
             Sassy Stripes stencil
             Jet Black Amalgam ink
Spectrum Noir alcohol markers: FL2, FL3, BP4, AG2
             Ultra Smooth Premium White cardstock
VersaMark ink
Spellbinders Nestabilities Big Scalloped Ovals Small die

MISTI

Sunday, 1 March 2020

Daffodil File Folder Box


It's time for a new challenge on the Scor-Pal site! This month, the theme is Spring/ Easter, or Anything Goes. To enter, make a project that has More Than One Score, and tell us where you used your Scor-Pal.

This month, I made a Daffodil File Folder Box. I love seeing the first flowers of the Spring, poking through the ground, and often the snow! One of my favourites are daffodils, and since the deer don't like them, I have some planted in my front garden.


You can store many things in the box - stamped images, scraps of patterned paper or cardstock, or anything else that is fairly flat. I have some die cuts that I had in a large box, but kept forgetting to use. I thought if I put them in here, then I would see them and use them. I think I will add some tabs to the dividers and I can mark which shape is in each section.


To see a detailed description of how I made the box, come back on the 15th!

Saturday, 29 February 2020

Sweet Camellia

Today is the last day of the month, so I am getting in just under the wire. This month, the Gina K. Designs Monthly Mix Challenge is Just Add Texture. I have both dry and heat embossing on my card, along with some sequins.


Last summer, I started following Jenny Card Designs on YouTube. She had a contest and gave away the Gina K. Designs Sweet Camellia stamp set. I won and am finally getting around to using it!

I stamped the image with VersaMark ink and heat embossed it in clear. Using a couple of small blending brushes, I added Gina K. Designs (GKD) Lovely Lavender and Jelly Bean Green ink. I added details with coloured pencils and blended with some odorless paint thinner.

I used some GKD Wild Lilac cardstock for my card base. I ran the front of it through my Cuttlebug with the Darice Diagonal Stripe embossing folder to create the embossed pattern. I fussy cut my image and popped it up with some foam squares.

The sentiment came from the same stamp set and was stamped with GKD Jet Black Amalgam ink. Then I cut it out with a Cottage Cutz Stitched Circle die and added it to the card with a foam square. I adhered a few sequins with some liquid glue.

I am also entering this in the Simon Says Stamp Wednesday Challenge - Anything Goes.

Thanks again to Jenny Card Designs for this beautiful stamp set!

Tuesday, 18 February 2020

PearlEx Powders

This week on the Mod Squad Challenge Blog, we are to use Perfect Pearls or other mica powders on our card.


I used the Gina K. Designs Lovely Lilies stamp set, by Claire Brennan. I stamped each layer with Ranger Perfect Medium onto Gina K. Designs Black cardstock, and added PearlEx Powdered Pigments. In between each layer, I used my anti-static bag and gently tapped over the image. I used #683 Bright Yellow and #658 Aztec Gold for the main flower, and #684 Flamingo Pink for the center. Then I added the stamen with the Bright Yellow. I stamped the sentiment and used the Pink PearlEx to colour it. Then I adhered some rhinestones before adding it to a white card base.

Monday, 10 February 2020

Sweet Friend

I liked combining challenges for my last card and decided to make another card for these four challenges: Gina K. Designs Monthly Mix challenge - Just Add Texture; Mod Squad challenge - You're All Heart; Splitcoaststampers MISTI Monday challenge - Happy Galentine's Day (make a card for your favourite gal); and Simon Says Stamp Wednesday challenge - With Love.


So I was trying to get some texture on the background, and I tried a technique that embosses with a stencil. I used a rubber mat with the stencil (ColorBox 'Lovely' stencil) and cardstock in my Cuttlebug and got a slightly raised design. I thought that it didn't show up that well, and decided to add some Gina K. Designs (GKD) Red Velvet ink through the stencil onto the raised parts. Well, now it looks like I just used a stencil! In person, you can feel that the hearts are raised. I added this panel to a piece of  GKD Red Velvet cardstock and then onto a white card base.

I found a couple of heart die cuts that I forgot I had, so I used my MISTI to line up and stamp the sentiment, from the GKD Sweet Camellia stamp set, with GKD Red Velvet ink. I then embossed it with clear embossing powder. I also sponged some ink on the edge of the heart. I added this to the red heart and adhered it to the card with some foam squares. I thought it needed a little something, so I used a Glue Dot to fasten the bow above the hearts.

Sunday, 9 February 2020

You Brighten my Day

There are a few challenges this week that have a similar theme, so I made a card that fits all of the requirements. I am entering it in the following challenges: 
Splitcoaststampers MISTI Monday challenge - Happy Galentine's Day (make a card for your favourite gal); and 


There are a few challenges this week that have a similar theme, so I made a card that fits all of the requirements. I am entering it in the following challenges: Gina K. Designs Monthly Mix challenge - Just Add Texture; Mod Squad challenge - You're All Heart; Splitcoaststampers MISTI Monday challenge - Happy Galentine's Day (make a card for your favourite gal); and Simon Says Stamp Wednesday challenge - With Love.


I started by adding some texture to my background with some texture paste that I made. I taped my white cardstock to a stencil and spread the texture paste through the stencil. Once it dried, I added some ribbon and taped it to a red card base.

I cut out a heart by hand, and using my MISTI, added my sentiment, and heat embossed it in white. I sponged the edge of the heart with some red ink. I added it to the card with some foam squares and finished it off with some heart rhinestones.

I used the following supplies:
MISTI
Gina K. Designs: Layered Daisies stamp set
              Sassy Stripes stencil
              Red Velvet cardstock and ink
VersaMark ink
homemade texture paste, ribbon, white embossing powder, foam squares, rhinestones

Monday, 3 February 2020

Assorted Cards

I made a few cards for challenges last month that I didn't post on my blog. So I thought I would show them to you.

This one uses strips of patterned paper and cardstock.


I used some digital stamps, cut them out and layered them onto a stenciled background for this card.


The next card has an alcohol marker marbled background. I used a piece of acetate, scribbled the markers onto it and spritzed it with rubbing alcohol. Then I laid a piece of photo paper on top to pick up the ink. I repeated that a couple of times to fill in all the areas and to get a nice pattern.


Thanks for having a look!

Sunday, 2 February 2020

Wishing You Joy

Before Christmas, Bella Crafts Publishing showed how to make a project, with products from Therm O Web and Gina K. Designs. There was also a contest to win a prize package from Therm O Web, and I won! This is what I received.


I made this card with some of the products.


The Glitz Glitter Gel gives such a nice sparkle, and is so easy to add through the stencil. Thanks so much to Therm O Web and Bella Crafts Publishing!

Saturday, 1 February 2020

Small Take-Out Box


It's time for the Scor-Pal More than One Score Challenge. This month the theme is Anything Goes, so I made a little Valentine treat box that looks like a little take-out box.


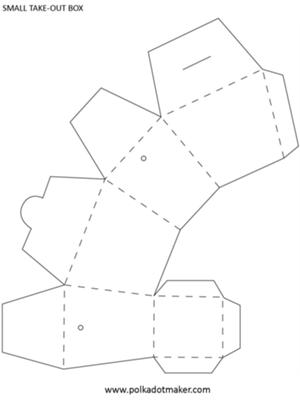
I received a box that looked similar to this for Christmas, but it was too big to fit on an 8 1/2" x 11" page. I thought about re-sizing it and then figured someone else might have already done the work. I looked online and found this template.

Take Out - Take Away Box Template


After I printed it on cardstock, I cut it out, and used my Scor-Pal to score on the dotted lines. I printed it again, on white paper, and glued it to the back of my patterned paper. I cut it out and then cut apart the 4 sides before attaching it to the cardstock. I used Scor-Tape to put the box together, so it would hold together well.

If I made this again, I would cover the inside, as well, because you can see the template markings. I think I would also leave the patterned paper in one piece, although I might need to cut it slightly larger to allow it to go around the corners.

It holds 4 of the candies seen below, but there isn't any spare room!