Tuesday, 31 October 2023

Coffeelovers Look Back


The 2023 Fall/Winter Coffee Lovers blog hop is coming up later this week, and we were invited to show our favourite projects from previous years. 

I have only made cards for a few of the years, but here is my favourite from each year, linked to the original blog post.


It was hard to choose which one I liked best from each year! Now I need to get ready for this year's blog hop!


Sunday, 22 October 2023

Sympathy card

Unfortunately, I needed a sympathy card this week. I already had the feathers stamped for the Gina K. Designs October Monthly Mix challenge - Emboss Resist, and thought it was the perfect focal point for my card.


The feathers came from the Stamper’s Favorites stamp set. I stamped them with VersaMark ink and heat embossed them in white. Then, I blended Blue Lagoon and Medium Lilac ink over the feathers. The sentiment is from the So Many Sentiments stamp set, and is stamped with Obsidian Amalgam ink.

I layered the front panel with Blue Lagoon cardstock before attaching it to a white card base.

Everything is from Gina K. Designs, except the VersaMark ink and embossing powder.

Thursday, 12 October 2023

Zenflowers Emboss Resist Card

This month, the Gina K. Designs Monthly Mix challenge is to use the Emboss Resist technique.


I started by stamping the flowers with VersaMark ink, and heat embossed them with white embossing powder. Then, I blended ink (Honey Mustard, Sweet Corn, Tangerine Twist) over the panel, using the flowers as a guide. I used a piece of paper towel to gently rub the ink off the embossed areas.

I stamped the sentiment with Chocolate Truffle amalgam ink on a strip of vellum, and embossed it with clear embossing powder. I folded the strip around the panel and attached it to the back, and then adhered the panel to a piece of Honey Mustard cardstock before adding it to a white card base.

The stamps (Zenflowers, Birthday Blessings) and inks are from Gina K. Designs.

Sunday, 1 October 2023

October Scor-Pal More Than One Score


This month, I made a simple pop-up card, with an Autumn theme.


When you open it, it has a pop-up element.


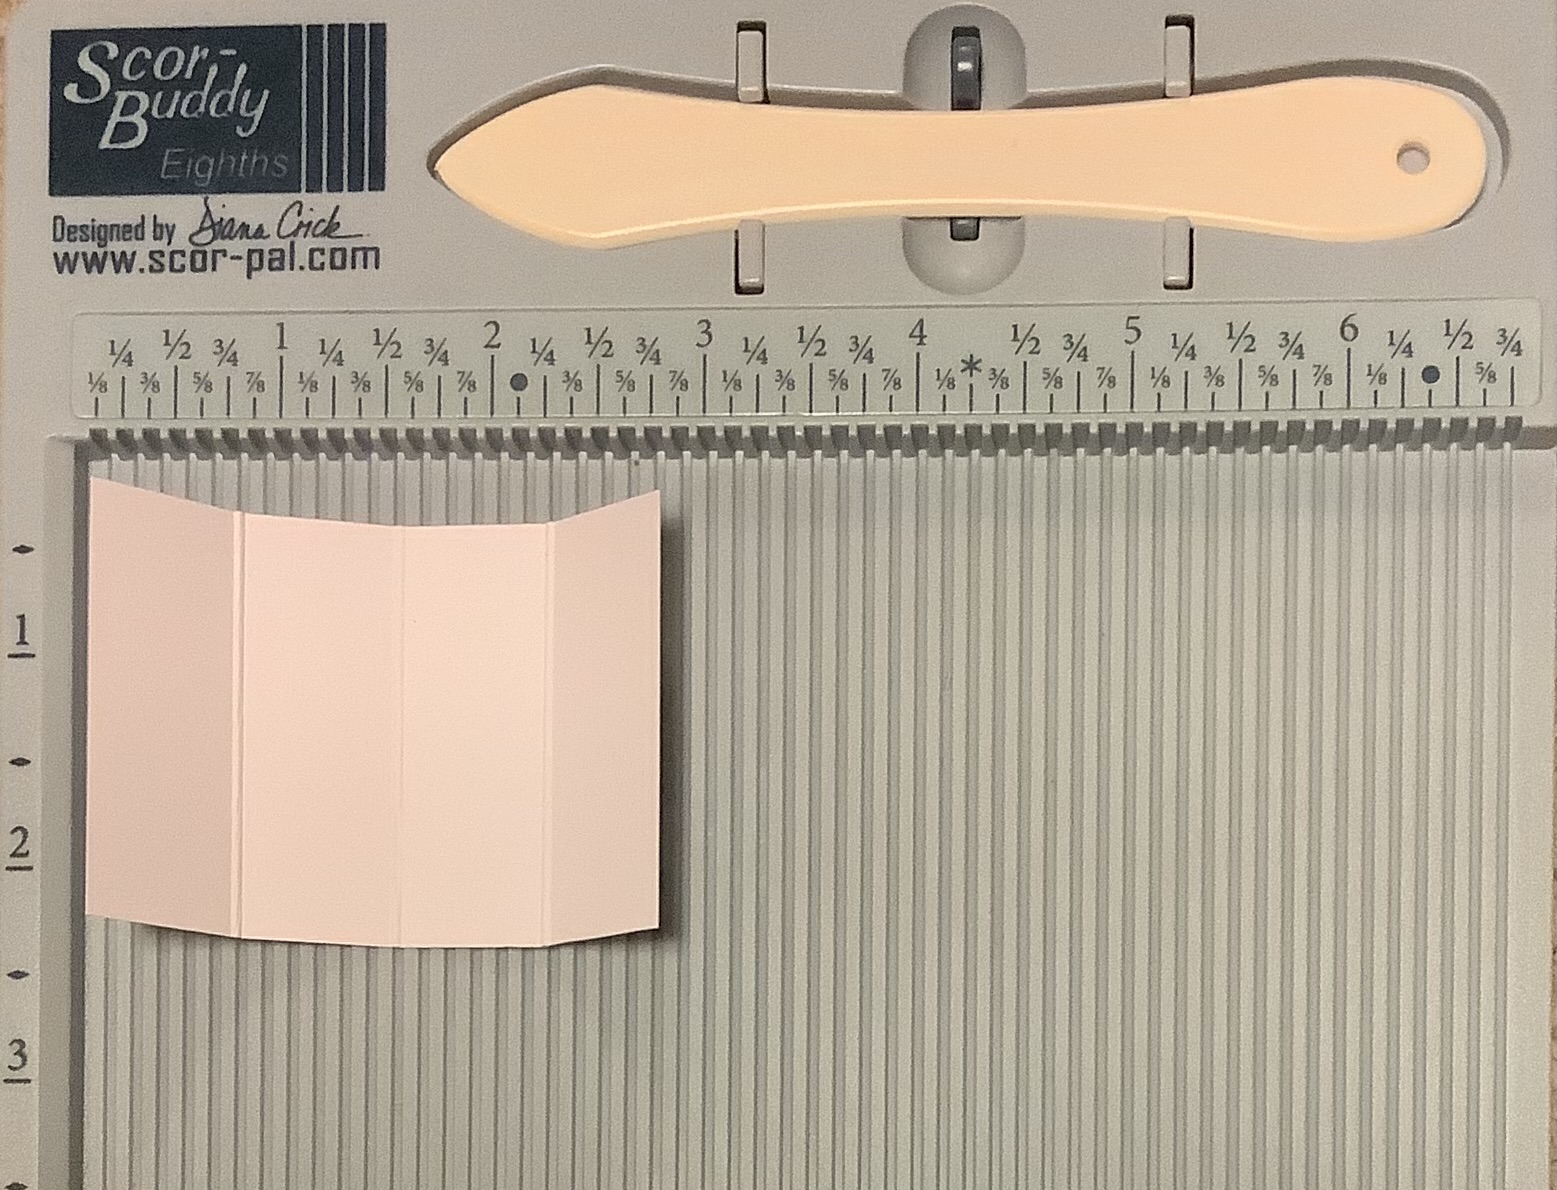
To make the pop-up element, you just need a piece of cardstock that measures 2" by 3". Using your Scor-Buddy, with the 3" side at the top, score it every 3/4", and fold along the scores.


Fold the left and right sides in to the middle, and add Scor-Tape to the side flaps.


Remove the backing paper, turn it over, and attach it to your card base, lining up the crease in the pop-up element with the crease in the card base.


Then you can attach anything you want popped up. If you have a larger item, you can make the pop-up element longer, and if you have a smaller item, you can make it smaller. You could make several, if you have several small items to add, especially if you were making a landscape orientation instead of portrait.

Then you can decorate the front of your card. My supplies are from Gina K. Designs.

I used the dies from the Autumn Wishes and Electric Pop Flowers stamp sets to cut out the leaves from white cardstock. Then I attached them to a white card panel and blended Sweet Mango, Sweet Corn, Honey Mustard, and Red Hot ink over the front of the panel. 

I used Chocolate Truffle amalgam ink to stamp the sentiment, from the Autumn Wishes stamp set, and then I clear embossed it before rounding the corners. I added this to the front panel and added a Chocolate Truffle panel before attaching it to a white card base.

For my popped up element, I stamped the leaves and added a Chocolate Truffle panel. I also added a few metallic leaves for some sparkle.

This is a quick and easy way to add a pop-up element to your cards!

Saturday, 30 September 2023

Another Faux Embossing card

 I made another card for the Gina K. Designs Monthly Mix Challenge - Faux Embossing.


All supplies are from Gina K. Designs.

I started with a piece of Sweet Mango cardstock, and placing it in the upper right hand corner of my MISTI, stamped the leaves with Coral Reef ink. I cleaned the stamps, but didn't move them. Then I shifted the cardstock down and to the left, and stamped with Ivory pigment ink. A bit of the Coral Reef ink shows on one side of the leaves, with the Ivory showing on the other. This gives an embossed look.

I stamped the sentiment with Coral Reef ink, added a Coral Reef panel and attached it to a white card base.

The leaves are from the Autumn Silhouettes stamp set, and the sentiment is from the Butterfly Kisses stamp set.


Friday, 29 September 2023

Penguin Palace Challenge #29

This month, the Penguin Palace challenge #29 is to use this colour palette as inspiration.


Here is my card.


I used the Penguin Palace The Rose Close-Up stencil, and inked it up with Gina K. Designs ink: 
Sweet Corn, Light Carnation, and Dark Carnation. The stencil doesn't have leaves, so I masked off part of the stencil and used some of the petals as leaves, which are in Jelly Bean Green ink. Then I blended some Turquoise Sea ink around the edges. 

This is a one layer card, as I made this right on the card base.

Monday, 11 September 2023

Faux Embossing Technique

The Gina K. Designs September 2023 Monthly Mix Challenge is Faux Embossing Technique. This is my card for the challenge.


To get this effect, I stamped the image, from the Summer Silhouettes stamp set, and the sentiment, from the Massive Messages stamp set, with Tranquil Teal ink, onto Turquoise Sea cardstock, using my MISTI. I wiped off the stamps, but made sure not to move them. I then stamped  with Ivory ink a few times. It lightens the blue ink and gives the 3D effect.

I added the panel to a white card base to finish the card.

All the supplies are from Gina K. Designs.


Friday, 1 September 2023

Scor-Pal September More Than One Score


This month, I made a card with some 3D flowers, so I needed to make a box for an envelope. 


To make this box, you will need:
2 pieces of heavy cardstock - 7 1/4" x 9 1/2"

Items to decorate, if desired. I used Heartfelt Creations Fuchsia Clusters stamp set, coloured with Spectrum Noir alcohol markers.

Take one of the pieces of cardstock, and place it in your Scor-Pal with the 7 1/4" side at the top. Score at 1" and 6 3/4". Turn it 90° to the left, and score at 1/2", 1 1/2" and 8 1/2". 


The dotted lines are the score lines, and the solid lines are the cut lines. When I made this template, it was 1/2" too wide. The written instructions give the correct measurements. Remove the parts marked with an X. If you want to decorate your box, it is much easier to do it now.


Repeat with the second piece of cardstock. You will make one more cut on this piece - the top right hand section - leaving just the tab at the top left. Place Scor-Tape on the right hand side flap of each piece.


Remove the tape backing and attach the two pieces of cardstock together on both sides. Place Scor-Tape on the bottom flap as shown below. Fold in side flaps, then the flap with the tape. Remove tape backing and fold in the last flap to adhere.


Here is the finished box.


For my card, I used the Heartfelt Creations Cascading Fuchsia and Fuchsia Clusters stamp sets on the front panel and then taped the panel to a card base. I scored a diagonal pattern in the green border, taped it to the front of the panel and attached the 3D fuchsias.


Thursday, 31 August 2023

More Smakin' Acetate

 I decided to make another card for the Gina K Designs August 2023 Monthly Mix Challenge - Smakin' Acetate. This time, I used re-inkers to make the background.


I dripped some Prickly Pear, Jelly Bean Green and Fresh Asparagus re-inkers onto the acetate, spritzed it with water and placed the cardstock on top. Then I lifted the cardstock off and let it dry. 

I wasn't sure if I liked the design that it made, but I decided to continue and see what it looked like at the end.

I first stamped the leaves, from the Skeleton Leaves stamp set, with Warm Glow Amalgam ink. It looked okay when it was wet, but by the time it dried, it almost disappeared. So, I tried to line up the stamps in the same position and restamped with Warm Cocoa ink. I didn't get them all lined up, but it gave a nice shadow image that I like. I layered it with some brown cardstock and attached it to a white card base.

The sentiment came from the So Many Sentiments stamp set, and was stamped with Warm Cocoa ink. I layered it with some brown cardstock and placed it at an angle. 

I was really happy with the finished card and I'm so glad that I didn't give up on it!


Tuesday, 29 August 2023

Smakin' Acetate

The Gina K. Designs August 2023 Monthly Mix Challenge is Smakin' Acetate. We are to make a background using this technique. 


Smakin' Acetate can be made with markers, stamp pads or re-inkers. You place some colour on a piece of acetate, spritz some water on it, and lay your cardstock down on top. When you lift up the cardstock, the colour will have transferred to it. 

I used Wild Dandelion, Turquoise Sea, and Dark Lilac ink cubes to make my background. I wasn't too sure about the results - it looked like a hot mess to me, but I thought if I stamped and embossed a background stamp on top, it might look better. I used the Petite Flourish background stamp, VersaMark ink, and clear embossing powder, and I was happy with the result.

The flowers and leaves, from the Stained Glass Flowers stamp set, were stamped with Obsidian Amalgam ink and coloured with Spectrum Noir alcohol markers.

I layered the pieces with cardstock which had some Dark Lilac ink blended on the edges.

The inks and stamps are from Gina K. Designs.