Wednesday, 8 November 2023

Coffee Lovers Blog Hop Card 4


This card uses a Digital freebie, called Santa and Elf Brentwood, that was given by Jessica Lynn Original Studios, one of the Super Sponsors of the Coffee Lovers Blog Hop.


I printed the image, and coloured it with Spectrum Noir Sparkle markers. I love the sparkle that they give! I trimmed it down, layered it with a red panel and attached it to a piece of patterned paper. I added all of this to a white card base.

Thank you, Jessica Lynn Original Studios, for the cute image!

Tuesday, 7 November 2023

Coffee Lovers Hop Card 3


I have another card for the Fall/Winter Coffee Lovers Blog Hop. This is card 3.


For this card, I used the Dare 2B Artzy Latte Love stamp set, and the coordinating Frappe & Donut die set.

I stamped the cup, sleeve and top with Gina K. Designs Obsidian amalgam ink, and coloured them with Spectrum Noir alcohol markers. Then I cut them out with the dies and glued them together.

I stamped the sentiment and coffee beans with Gina K. Designs Chocolate Truffle amalgam ink, added a piece of patterned paper from Gina K. Designs Give Thanks paper pack, and popped up the cup with some foam squares.

Coffee Lovers Hop Card 2


Today I have my second card for the Fall/Winter Coffee Lovers Blog Hop.


It is a digital stamp from Stamplorations, called Coffee Bloom Prints Digital Stamp. I printed it on a lighter weight cardstock that would work with my printer, and coloured it with Spectrum Noir alcohol markers.

Then, I fussy cut it and attached it to an 8 1/2" x 11" piece of heavy weight cardstock. I scored and folded the cardstock along the left side of the mug. Then, using a Fiskers fingertip detail knife, I cut around the mug to trim off the extra cardstock.

This makes a nice shaped card, which stands up. I didn't add a sentiment to the front, as I didn't want to cover up any of the pretty design!


Monday, 6 November 2023

Fall/Winter Coffee Lovers Blog Hop


Here is my first card for the Fall/Winter Coffee Lovers Blog Hop. I am a little slow getting started, but I hope to have more cards in the next few days.


I stamped the images and then used the stencil for the background. I coloured in the teapots and teacups with coloured pencils, and added my sentiment. This was a quick and easy 1 layer card!

Supplies:
Funky Fossil Time for Tea stamp set
Funky Fossil Pincushion Pattern Stencil - I thought they looked like snowflakes!
Gina K. Designs Tranquil Teal and Bubblegum Pink ink
Blending brushes with some blue and pink ink left on them


Wednesday, 1 November 2023

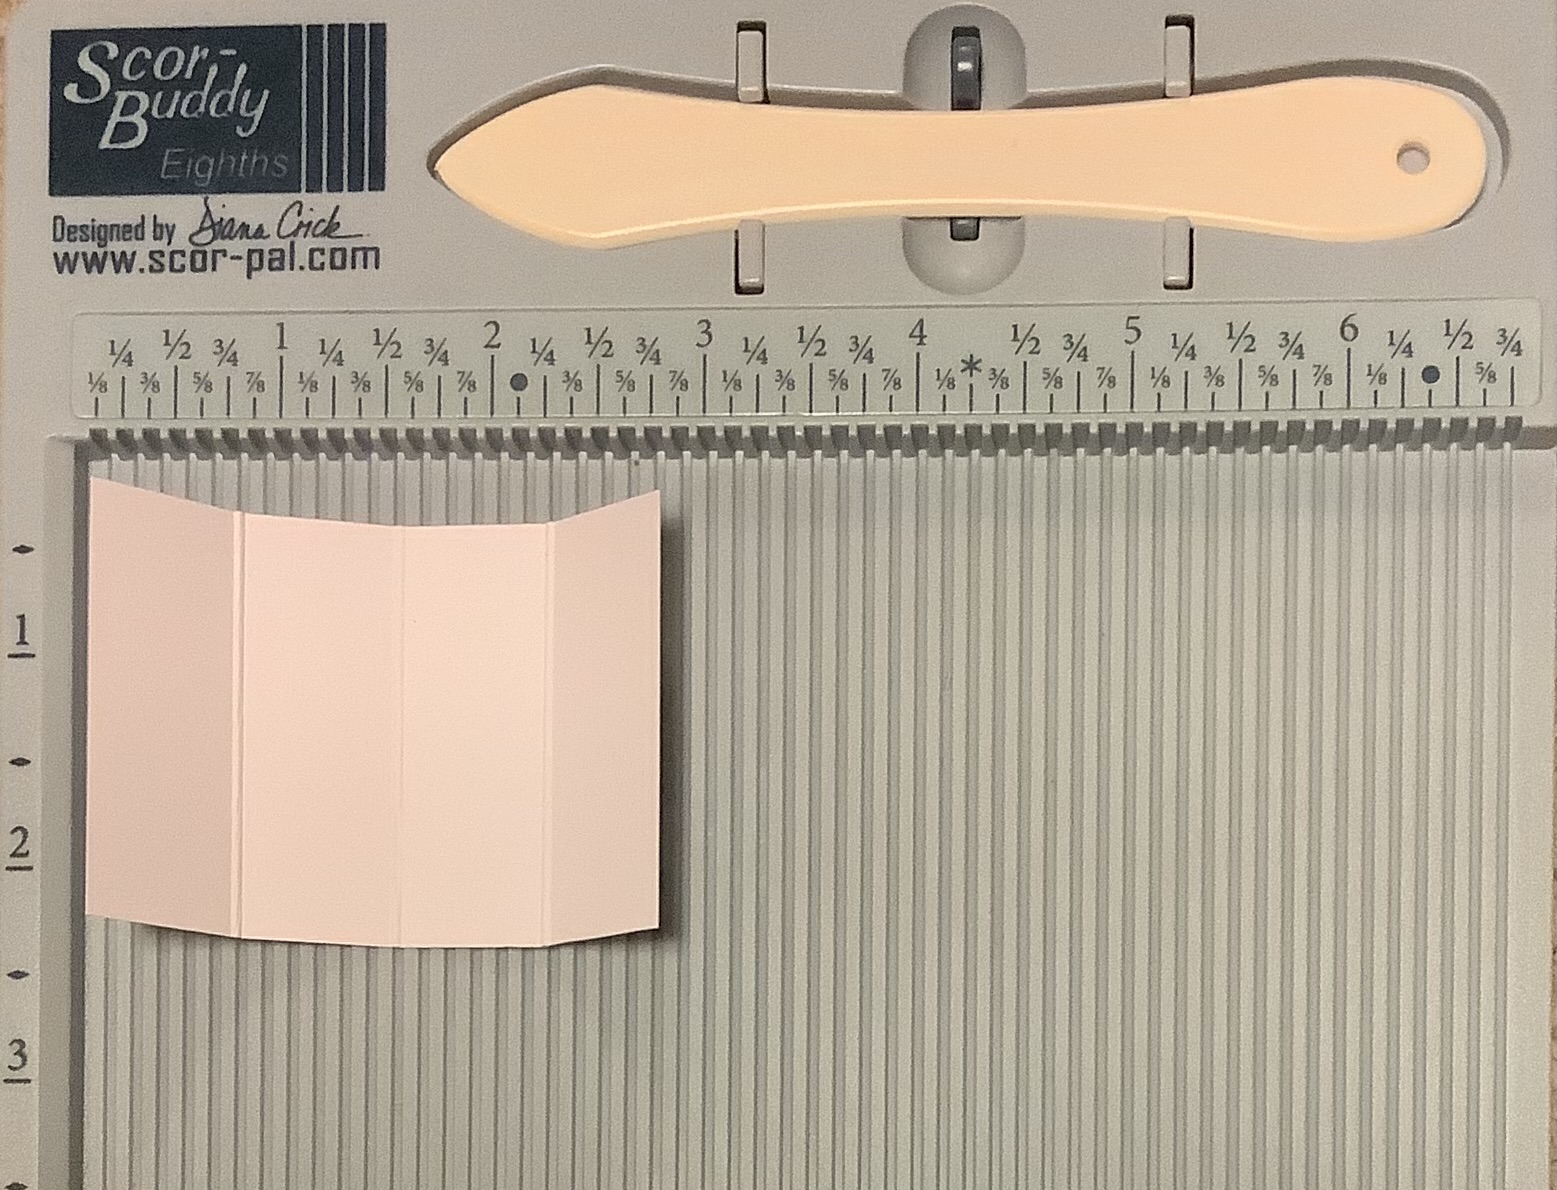
November Scor-Pal More Than One Score


This month, I made a card with a few simple scores and folds. and it's easy enough that you can make a batch of them for your Christmas cards.


To make this card, you will need:

4 pieces of double sided paper or cardstock - 2 1/2" x 1 3/4"
A piece of cardstock for the middle - approximately 1 1/2" - 1 5/8" square
A piece of cardstock for the layer - 4 1/8" x 5 3/8"
An A2 size card base

I used DCWV Holiday Collection - The Christmas Stack for my double sided cardstock, Recollections Matte Gold Foil cardstock for the layer, Gina K. Designs Holiday Frame stamp set for the sentiment, and a Cottage Cutz Stitched Square die for the middle piece.

To start, lay out your 4 small pieces of cardstock in the arrangement you want. 


For the 4 middle corners, on the back of each piece, make a mark 1" from the corner on each side. Then, line up the marks with a score line on your Scor-Buddy and score. You'll notice that there are marks at the bottom to help you line up with the inch marks at the top.


Fold along the score line toward the front.


Tape the 4 pieces to the outer corners of the layer and place the small square in the middle. Then, tape all this to the card base.

Here's another picture, showing the shine of the foil and embossed sentiment.


Tuesday, 31 October 2023

Coffeelovers Look Back


The 2023 Fall/Winter Coffee Lovers blog hop is coming up later this week, and we were invited to show our favourite projects from previous years. 

I have only made cards for a few of the years, but here is my favourite from each year, linked to the original blog post.


It was hard to choose which one I liked best from each year! Now I need to get ready for this year's blog hop!


Sunday, 22 October 2023

Sympathy card

Unfortunately, I needed a sympathy card this week. I already had the feathers stamped for the Gina K. Designs October Monthly Mix challenge - Emboss Resist, and thought it was the perfect focal point for my card.


The feathers came from the Stamper’s Favorites stamp set. I stamped them with VersaMark ink and heat embossed them in white. Then, I blended Blue Lagoon and Medium Lilac ink over the feathers. The sentiment is from the So Many Sentiments stamp set, and is stamped with Obsidian Amalgam ink.

I layered the front panel with Blue Lagoon cardstock before attaching it to a white card base.

Everything is from Gina K. Designs, except the VersaMark ink and embossing powder.

Thursday, 12 October 2023

Zenflowers Emboss Resist Card

This month, the Gina K. Designs Monthly Mix challenge is to use the Emboss Resist technique.


I started by stamping the flowers with VersaMark ink, and heat embossed them with white embossing powder. Then, I blended ink (Honey Mustard, Sweet Corn, Tangerine Twist) over the panel, using the flowers as a guide. I used a piece of paper towel to gently rub the ink off the embossed areas.

I stamped the sentiment with Chocolate Truffle amalgam ink on a strip of vellum, and embossed it with clear embossing powder. I folded the strip around the panel and attached it to the back, and then adhered the panel to a piece of Honey Mustard cardstock before adding it to a white card base.

The stamps (Zenflowers, Birthday Blessings) and inks are from Gina K. Designs.

Sunday, 1 October 2023

October Scor-Pal More Than One Score


This month, I made a simple pop-up card, with an Autumn theme.


When you open it, it has a pop-up element.


To make the pop-up element, you just need a piece of cardstock that measures 2" by 3". Using your Scor-Buddy, with the 3" side at the top, score it every 3/4", and fold along the scores.


Fold the left and right sides in to the middle, and add Scor-Tape to the side flaps.


Remove the backing paper, turn it over, and attach it to your card base, lining up the crease in the pop-up element with the crease in the card base.


Then you can attach anything you want popped up. If you have a larger item, you can make the pop-up element longer, and if you have a smaller item, you can make it smaller. You could make several, if you have several small items to add, especially if you were making a landscape orientation instead of portrait.

Then you can decorate the front of your card. My supplies are from Gina K. Designs.

I used the dies from the Autumn Wishes and Electric Pop Flowers stamp sets to cut out the leaves from white cardstock. Then I attached them to a white card panel and blended Sweet Mango, Sweet Corn, Honey Mustard, and Red Hot ink over the front of the panel. 

I used Chocolate Truffle amalgam ink to stamp the sentiment, from the Autumn Wishes stamp set, and then I clear embossed it before rounding the corners. I added this to the front panel and added a Chocolate Truffle panel before attaching it to a white card base.

For my popped up element, I stamped the leaves and added a Chocolate Truffle panel. I also added a few metallic leaves for some sparkle.

This is a quick and easy way to add a pop-up element to your cards!

Saturday, 30 September 2023

Another Faux Embossing card

 I made another card for the Gina K. Designs Monthly Mix Challenge - Faux Embossing.


All supplies are from Gina K. Designs.

I started with a piece of Sweet Mango cardstock, and placing it in the upper right hand corner of my MISTI, stamped the leaves with Coral Reef ink. I cleaned the stamps, but didn't move them. Then I shifted the cardstock down and to the left, and stamped with Ivory pigment ink. A bit of the Coral Reef ink shows on one side of the leaves, with the Ivory showing on the other. This gives an embossed look.

I stamped the sentiment with Coral Reef ink, added a Coral Reef panel and attached it to a white card base.

The leaves are from the Autumn Silhouettes stamp set, and the sentiment is from the Butterfly Kisses stamp set.