Sunday, 7 July 2019

Just in CASE

This week, the challenge on the Mod Squad Challenge Blog is called Just in CASE.  We have to CASE (Copy and Share Everything) the card that's on the blog post. Here's my version:


I am also entering this in the Simon Says Stamp Monday Challenge - Make your own Background.

I stamped the flowers and leaves, from the Gina K. Designs (GKD) Where Flowers Bloom stamp set, with GKD Black Amalgam ink on a piece of Spectrum Noir Ultra Smooth Premium White cardstock. I coloured them in with Spectrum Noir Alcohol markers HB1, HB2, HB3, LV2, LV3, AG1, AG3, AG5. I used PL4 to add groups of dots around the images.

I cut this panel into three pieces, and matted each one with a piece of white cardstock that had the edges coloured with the PL4 marker. I attached these to a white card base with foam tape.

I then stamped an extra flower on a separate piece of cardstock, coloured it and fussy cut around it. Using a couple of the Cottage Cutz Stitched circle dies, I cut out two circles that were a little bigger than the flower. I coloued the smaller one with the PL4 marker, and for the larger one, I just coloured the very edge, so it looks like a white circle on top of the purple circle. I used Scor-Tape to adhere all of these layers together. 

Using VersaMark ink, I stamped the sentiment, from the GKD Stamper’s Favorites stamp set, onto a rectangular piece of cardstock. I heat embossed it in silver, matted it with a piece of coloured cardstock, added the flower, and attached it with some foam tape.

To finish off the card, I added Simply White Nuvo Crystal Drops to the centers of the flowers.


Monday, 1 July 2019

Bridge Card


The theme for the Scor-Pal challenge this month is Anything Goes, with the option of Patriotic. You just need to have more than one score on your project. I am  Canadian, so I used red and white on my card.


I saw this card design on Jennifer McGuire's blog, and thought I would give it a try. It is called a Bridge card, because the layer in the front bridges the two sides together.

I started with a piece of Gina K. Designs Red Velvet cardstock that measured 5 1/2" x 8". With the 8" side at the top of my Scor-Pal, I scored at 1 1/4" and 2 1/2" from each side. I folded both sides in at the 2 1/2" mark, and then folded them back at the 1 1/4" mark. This makes a 5 1/2" square card. If you want an A2 size card, you can either start with a 4 1/4" x 8" piece and score as indicated above, or you can start with a 5 1/2" x 5 3/4" piece and score at 3/4" and 1 1/2" on each side. 

I took a piece of white cardstock, and using my Scor-Pal, I scored a diamond pattern on it. I cut it down to 3" x 5 1/2" and adhered it to the inside of the card with Scor-Tape.

Using Spectrum Noir Ultra Smooth Premium White cardstock, I stamped the flowers and leaves, from the Altenew Always There stamp set, with Gina K. Designs Black Amalgam ink. I coloured them with Spectrum Noir Alcohol markers: CR7, CR11, DR3, DR7, CG1, CG2, CG4, LY3, GY1, fussy cut them and went around the edges with the True Black marker. That covered up any spots that had a bit of white showing.

I took another piece of white cardstock and die cut the edges, using a die that came with a Cardmaking & Papercraft magazine: Sara Davies Signature Collection Shabby Chic Antique Edge Die. I arranged the flowers and leaves, and used Scor-Tape to adhere them. I taped this piece to the left hand side of the card, folded this section in, folded out the right hand side, and taped it to the outside right hand piece. That way, when you stand it up, both sides will be standing out to the front.


I didn't add a sentiment to the front, but I attached a piece of white cardstock to the back of the card and added a sentiment and personal message there.

I had an extra flower and leaf, so I decided to make a matching envelope.


I used the Scor-Envi, which has the measurements of the paper and where to score printed on it. It makes it so easy to create all sizes of envelopes.

I hope everyone in Canada and the United States has a happy holiday - July 1st and 4th, respectively!

Tuesday, 25 June 2019

Scor-Pal Pinspired Card Holder

Hi, everyone! I am Dawn, your Pinspired host this month. We look at the Scor-Pal Pinterest page, pick a project and re-create it, putting our own spin on it. I found this Cardfolio, by Toni Storie and thought I could make it fit this month's theme on the Scor-Pal blog, by giving it a Summer feel.


Here is my project:


I live in Nova Scotia, Canada, so when I think of Summer, I think of the ocean, lighthouses and beaches. When I came across this piece of patterned paper in my stash, I thought the large yellow shape looked like a sun, so it seemed perfect for this project.

To make this Cardfolio, start with a 12" x 12" piece of two-sided patterned paper. I used a piece of  My Mind’s Eye - The Sweetest Thing Paper. Trim off a 2" x 12" piece, and cut it in half to give 2 pieces measuring 2" x 6". Trim off another piece, measuring 1" x 12". Cut that in half, to give 2 pieces measuring 1" x 6". This leaves you with a 9" x 12" piece.


Place the 9" x 12" piece into your Scor-Pal with the 12" side along the top. Score at 1/2", 5 1/2", 6 1/2" and 11 1/2". 


With the 9" side along the top, score at 1", 1 1/2", 7 1/2" and 8".


On the 2" x 6" pieces, place the 2" side at the top and score at 1/2".


On the 9" x 12" piece, cut out the four corners. Cut on the 1/2" line until you get to the 1 1/2" line, and cut off. On the 5 1/2" and 6 1/2" lines, cut down to the 1 1/2" line. Cut on the 1" score line between them, leaving a 1/2" tab.


Round the corners of the four inside flaps.


Round the corners opposite the 1/2" scored side on the 2" x 6" pieces.


Adhere Scor-Tape to the 1/2" scored sections. I used a strip of 1/4" tape and a strip of 1/8" tape. I find this to be easier than using a 1/2" strip. That way, if your scoring is slightly off, you won't have tape going off the edge. On one of the 1" x 6" piece, adhere tape to the back. You can discard the other 1" x 6" piece, or use it for another project.


Remove the backing paper from the tape on the 2" x 6" pieces and adhere them to the 1/2" flap on each side of the project.


Turn the piece over, remove the backing paper, and attach the 1" x 6" piece in the middle section. This will reinforce the spine of the cardfolio.


Make sure all your folds are well creased. Add Scor-Tape to the small spine tabs and to both sides of each flap, as shown. 


Remove the backing from the tape on the small tabs and adhere them to the inside of the spine. Remove the backing from the left flap, fold the top and bottom flaps in, and adhere the side flap down. Repeat with the right side. This creates the pockets that will hold your cards and envelopes. 


Now you can add your embellishments. I stamped the sentiment and lighthouse, from the Gina K. Designs By the Sea stamp set, with Gina K. Designs Black Amalgam ink. I coloured the lighthouse with Spectrum Noir Alcohol Markers: CR4, CR8, CR11, IG1, IG2, CT2, RB3, IG3, IG5, IG9, EB1, AG3, MB1, MB3, MB4, Blender pen, and fussy cut it. 

I cut out the sentiment with a die from the Gina K. Designs Decorative Label die set and used The Spectrum Noir marker MB3 to trace around the edge of the shape. I used the same marker to go around the edge of the lighthouse shape.

I added a piece of twine with some 1/8" Scor-Tape, and attached a button and a loop to keep the two sides together. I adhered the sentiment and lighthouse with some foam tape.


I put 3 cards and envelopes in each side, and there is still lots of room. You could also fill this with post cards or note paper to write to your friends and family when you are on vacation!


You still have a few days left to enter this month's challenge. Just make sure it has more than one score line and follows the theme of Warmer Days.

Sunday, 23 June 2019

Shaker Globe

I made another shaped card for the Splitcoaststampers MISTI Monday June 2019 Challenge.


I used a Snow Globe die from Craftmania, but made a beach scene instead of a snow scene. After I folded my card base, I made sure the die was just above the top edge, so that the two layers would still be attached at the top. I sponged the background with Gina K. Designs ink: Sandy Beach, Kraft, Sea Glass, and Ocean Mist. I stamped the bird images and the sentiment, from the Gina K. Designs By the Sea stamp set, in Dark Chocolate ink. The seashells stamp is one that I had in my stash, but I don't know who made it.

I cut out a circle frame and sponged it with the same colours as the background. I cut a piece of acetate which was slightly smaller than the frame, and glued it to the back of the frame. I attached a double layer of foam tape to the edge of the acetate. I placed a couple of spoonfuls of shaker material on the background and placed the frame on top. You'll notice in the picture that the frame sticks up slightly higher than the card base since it's a full circle.

We're starting to get some warmer temperatures here, so hopefully it will soon be beach weather!

Saturday, 15 June 2019

Nautical Masculine Card

The Mod Squad challenge this week is Light Your Way. We are to make a masculine card with a nautical theme. On the Splitcoaststampers forum, the Try a New Technique challenge is Ink Blending. I made this card that satisfies both challenges.


I used sponge daubers to ink up the background, using the following colours: Sea Glass, Ocean Mist, Turquoise Sea, Tranquil Teal, and Powder Blue. I stamped the images, from the By the Sea stamp set, in Moonlit Fog, and added the grass using Grass Green ink. I attached this panel to a Tranquil Teal card base.

Using a White Sakura Gelly Roll pen, I coloured in the front sailboat. I stamped the sentiment, cut it out and popped it up with some foam squares.

The stamp set, ink and cardstock are all from Gina K. Designs.

Monday, 10 June 2019

Eclipse Card

I made this card for two challenges: the Mod Squad challenge - Total Eclipse of the Card, and the Splitcoaststampers MISTI Monday June 2019 challenge - The Shape of Things. I am also entering it in the Splitcoaststampers July 2019 Christmas Card challenge - make a fun fold or shaped card.


As you have probably guessed from the titles of the challenges, I had to make a shaped card and use the Eclipse technique. Basically, the Eclipse technique means that after you have your background made, you cut out a portion, with a die or an electronic machine, and then you replace it after you have raised it up with foam tape or layers of cardstock.

First, I made the card base. I took a piece of white cardstock, folded it in half and used the scalloped oval die to cut it out. I made sure that the top of the die was above the fold, so that the cardstock was still connected at the top. 

Using the Carta Bella Lattice stencil and Gina K. Designs Cherry Red and Dusty Rose ink, I sponged the pattern onto another piece of white cardstock that I had cut out with the oval die. I cleaned the stencil and lined it back up to add some Gina K. Designs White Glitz Glitter Gel over the pattern. 

While that was drying, I stamped the sentiment, from Gina K. Designs Seasonal Sentiments Stamp set, with Memento Tuxedo Black ink, trimmed it down and sponged the edge with Cherry Red ink. Once the panel was dry, I cut out the Christmas sentiment, from the coordinating die set, from the middle of the panel. I also die cut 4 more from white cardstock and glued all the layers together. I used the Scor-Buddy Mini Mat when I was gluing, as I knew that it would just clean off the shiny surface on the back.

To assemble the card, I attached the front panel onto the card base with some Scor-Tape, glued the Christmas sentiment back in place, and popped up the Merry piece with some foam squares.

This was the first time I had tried the Eclipse technique, but it was fairly easy and I will use it again. I hope you will try it, too!

Saturday, 1 June 2019

Butterfly Drawer Box

It's time for another challenge at Scor-Pal. The More Than One Score Challenge for June is Warmer Days. So that could be Summer, warm colours, etc. Your card or project needs to have more than one score line and follow the theme. I made a box with drawers that I imagined could be used to hold treasures that were found during the summer.


I found this box as part of the Desk Set, on page 32, in the Score, Fold, Create! book, by Scor-Pal. This book is really helpful, as it gives templates, scoring directions and even where to place your Scor-Tape.

To make the box, start with a piece of 11 3/4" x 11 3/4" double sided paper. I used some Stampin’ Up! Sunny Garden Designer Series Paper. Using your Scor-Pal, score at 1", 4 1/4", 7 1/2" and 10 3/4". Rotate the paper 90 degrees and repeat the scoring. Fold along all of the score lines and use your scoring tool to make a nice crease. Referring to the picture below, cut and remove the corner sections and cut along the middle score lines on the two edges to make the flaps.


The two pictures below show the placement of the Scor-Tape. The outside pattern is on the top, with the inside underneath. For the outside, I drew over the tape paper with a black marker to make it easier to see.


Assemble the box, making sure to fold and adhere the 1 inch tabs last.


For the drawer, start with an 8 1/8" x 8 1/8" piece of double sided paper. Score at 1" and 2 1/2". Rotate and repeat for all 4 sides. Fold along all the score lines. Refer to the pictures below for the cutting lines, and where to place the Scor-Tape.


Assemble the drawer, adhering the 1 inch tabs last. Repeat for the second drawer. I added some Stampin' Up! brads for the handles.

The box shelf is made from a 9" x 4 1/4" piece of paper. With the 9" side at the top, score at 4 1/2". Turn the paper over, and score at 1 1/2" and 7 1/2". With the 4 1/4" side at the top, on the wrong side, score at 1/2" and 3 3/4". When you are folding the score lines, fold away from you. Cut out the four corners and cut along the 4 1/2" line into the 1/2" line on each side. Refer to the picture for the Scor-Tape placement.


To assemble the shelf, fold in half and adhere the middle part, making sure the side and 1 1/2" flaps are not adhered. Before attaching into the box, make sure that the drawers will fit. Attach the 1 1/2" flaps to the back of the box, and then attach the side flaps to the side of the box. 

Decorate the box, if desired. I added a die cut butterfly (Die-Versions “Butterfly Kisses” Whispers die) to the top with some foam tape.


Monday, 20 May 2019

Patterned Die Cut

This is my entry for the Splitcoast Stampers MISTI Monday May 2019 challenge. We are to have a die cut of patterned paper.


I decided to use my Cheery Lynn Designs Italian Flourish Doily Die and cut a piece of patterned paper from the Crate Paper - Oh Darling paper pad. I layered that onto a piece of orange cardstock which I attached to a cream coloured card base.

I bought Issue 188 of Simply Cards & Papercraft recently, and it included the Altenew Layered Daffodil die collection. I tried a few different colours before I found this combination and love the way it looks 3 dimensional. I cut out a piece of cream cardstock with the Creative Memories Oval cutting system, stamped the sentiment, from the Gina K. Designs Layered Daisies Stamp set with Stampin’ Up! Peach Parfait ink, and attached the daffodil. I popped this up with some foam squares.

I don't have a MISTI, but it sure would have made stamping the sentiment straight much easier!

Monday, 6 May 2019

Mother's Day Card

There is a new Monthly Mix Challenge at Gina K. Designs. The theme is Just "Wing" It, and we must include something with wings on our project. The Mod Squad Challenge this week is to make a Mother's Day card, so I made a Mother's Day card with butterflies.


I used a technique that I saw on Jennifer McGuire's YouTube channel. I die cut the shapes of the butterflies out of the top layer of a top folding card and attached the butterflies inside with some Scor-Tape so they show through. 

The butterflies are actually made from some leftover foil. I had used the foil on the butterfly Foil Mates and saved what was left. Then I used some black cardstock and glued on the leftover foil. This gave me the black in the middle, and the foil on the rest. (I think next time I will use an adhesive sheet of some sort. It was hard to spread the glue evenly.) I then cut them out with the matching dies. I added the body and antennae on each one with an alcohol marker.

I stamped the sentiment onto a piece of Jelly Bean Green cardstock, cut it out and attached the ends to the card front. I punched out the borders in the same colour and attached them to the sides.

Here is a picture of the inside.


The foil is so shiny that it is hard to get a good picture, but it looks so pretty in real life!


I used the following supplies:
Gina K. Designs: Stamp n Foil Butterfly Kisses Dies
                            Glittering Green Fancy Foils 
                            Jelly Bean Green cardstock 
                            Holiday Frame Fillers stamp set
Memento Tuxedo Black ink 
Spectrum Noir True Black alcohol marker
Scor-Buddy
Scor-Tape
glue; border punch; white, black cardstock from my stash

Wednesday, 1 May 2019

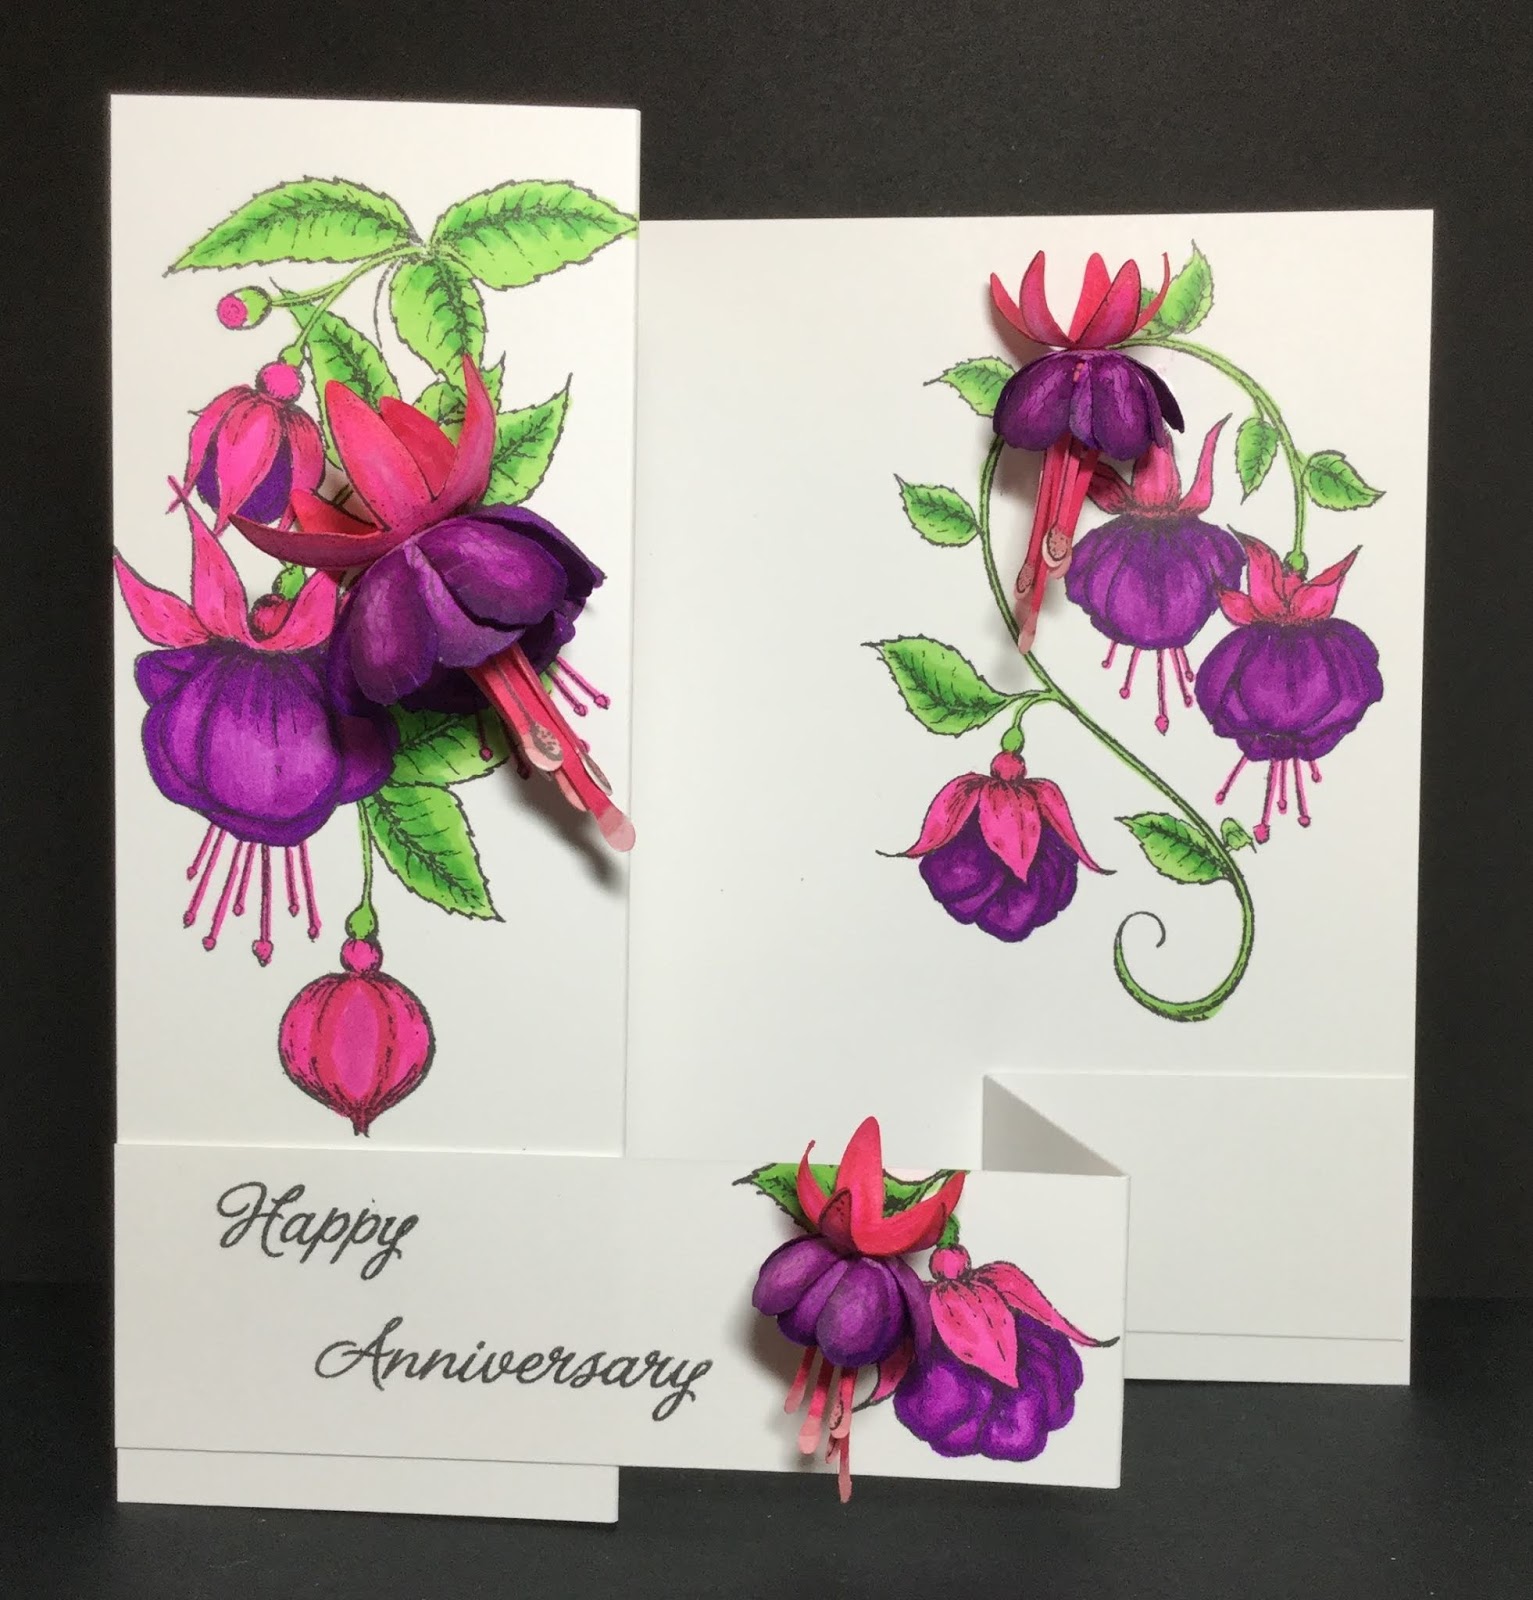
May Scor-Pal Challenge

This month, the Scor-Pal More Than One Score Challenge #59 is Floral Fantasy. You can make anything, as long as it has more than one score line, and follows the theme. When I saw that the theme was flowers, I thought of a 3D set of stamps by Heartfelt Creations called Cascading Fuchsia. 


This set comes with three stamps that make 3 different sizes of flowers. Using a piece of Spectrum Noir Ultra Smooth Premium White Cardstock,  I stamped them with Gina K. Designs Black Amalgam ink, since I was going to colour them with alcohol markers. I cut them out and coloured them with Spectrum Noir alcohol markers: MG1, MG2, MG4, BP3, PL2, PL3, PL4, AG2, AG3, and AG4. Once they were dry, I used the McGill Paper Shaping Tool and Piercing Mat to shape them. I glued the pieces together and set them aside to dry.

For the card base, I started with another piece of white cardstock that measured 5 3/4" by 8 1/2". With my Scor-Pal, I placed the 8 1/2" side at the top and scored at 2 1/8" and 4 1/4". I also cut a piece of cardstock that was 1 1/4" wide by 8 1/2" long. I scored this at 4 1/4" and 6 3/8". 


I stamped my images, from the Heartfelt Creations Fuchsia Clusters stamp set, with the Black Amalgam ink and coloured them with the Spectrum Noir markers. I added the sentiment, from the Hero Arts Sentiments stamp set CL342.

To finish off the card, I used Scor-Tape to attach the strip near the bottom, and then added the three flowers.

I hope you can join us for this challenge and look forward to seeing your creations!