Friday, 27 March 2020

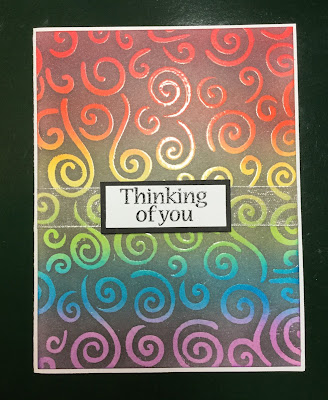
Rainbow Resist

When I was watching Gina's video the other day, I was inspired to create another rainbow card. I am entering this in the Gina K. Designs Monthly Mix Challenge - Somewhere Over the Rainbow, and Simon Says Stamp Wednesday Challenge - Anything Goes.


I started by blending a rainbow of ink colours onto a piece of white cardstock. Once the ink was thoroughly dry, I used a sponge dauber and added VersaMark ink through a stencil. I removed the stencil, and heat embossed it in clear. Then I blended Slate ink over the entire background. I thought about using black ink, but wanted a softer look, so I went with a dark gray. The embossing powder keeps the ink from colouring the stenciled design and it shows through.

I didn't want to cover up too much of the background, so I stamped and embossed the sentiment, trimmed it down and added a black mat. I attached a piece of see through ribbon before adhering it to a white card base, and used some foam squares to add the sentiment.

I used the following supplies:
Gina K. Designs: Red Velvet, Coral Reef, Wild Dandelion, Lucky Clover, Blue Raspberry, Wild 
                                   Lilac and Slate ink
                            By the Sea stamp set
                            White, Black cardstock
Plaid FolkArt stencil - Swirl Background
VersaMark ink

I hope everyone is doing well. Stay safe.

Sunday, 22 March 2020

March Moodboard Challenge

This month, White Rose Crafts Moodboard Challenge has flowers, a bunny, a fawn and blue skies. It also has the colours Royal Blue, Spring Green, Sunshine Yellow and White.


 I was inspired by the colours, flowers and blue sky.


We are also asked to use products that White Rose Crafts sells. I chose Tim Holtz Flights of Fancy stamp set.

I started by adding some Gina K. Designs(GKD) Blue Raspberry ink to the top of a piece of white cardstock with a blending brush. I added some clouds with the FairyTale Creations Chalk Talk I stencil.

Using GKD Key Lime ink, I blended some ink onto the bottom of the panel. Then, using my MISTI, I stamped the flowers with GKD Wild Dandelion ink. I then inked the stems with the Key Lime ink and stamped again. I added the butterflies and sentiment, also using my MISTI. I used a black marker to colour in the body and antennae of the butterflies. I added this panel to a white card base.


I hope everyone is okay and staying safe. 

Friday, 20 March 2020

Running Rainbow

I decided to make another card for the Gina K. Designs Monthly Mix Challenge - Somewhere Over the Rainbow.


I've seen this idea before, but I haven't tried it. I used some Hilroy Watercolour paper and scribbled some Staedtler dye-based markers across the top. Then I used a water brush, dripped a couple of drops of water onto the red scribble and let them run to the bottom of the piece of paper. I then went to the yellow scribble and repeated the process. I didn't do the orange one right away, as the red was still wet and I didn't want them to run together. 

After I had finished all the colours, I thought it looked a little bare with only two trails from each colour, so I repeated the whole process. I used the end of my pokey tool to help guide the trails so they didn't run in the same place as the first time.

Once it was completely dry, I attached it to a black mat and then a white card base. I stamped the sentiment, from the Gina K. Designs Especially for You stamp set, in Gina K. Designs Jet Black Amalgam ink. After I added a black mat, I adhered it with some foam squares.


Thursday, 19 March 2020

Rainbow Mandala

This month, the Gina K. Designs Monthly Mix Challenge is Somewhere Over the Rainbow. We need to have a rainbow of colours, or the word rainbow in our sentiment.


I decided to go with a rainbow of colours and used the Gina K. Designs Mandala Maker stamp set, by Rina K., with the wreath builder template and my MISTI.

I stamped my design on Spectrum Noir Ultra Smooth Premium White cardstock with Gina K. Designs (GKD) Jet Black Amalgam ink, except for the middle section. For that, I used a rainbow of GKD ink: Red Velvet, Peach Bellini, Lemon Drop, Jelly Bean Green, Turquoise Sea, Blue Denim, Wild Lilac, and Bubblegum Pink.

I coloured in the rest of the design using Spectrum Noir alcohol markers: DR2, CR3, CT1, CG1, IB2, TB6, LV2, and BP1. I tried to match the markers to the ink that I used.

For the sentiment, I used the GKD Dazzling Dahlia stamp set, stamped it with the Jet Black Amalgam ink and heat embossed it in clear. I used a black mat before attaching it to a white card base. I added some rhinestones for some bling.
 

Sunday, 15 March 2020

Daffodil File Folder Tutorial


Hi, everyone. At the beginning of the month, I showed my project for the Scor-Pal More than One Score Challenge March #68 - Anything Goes or Spring/Easter. I'm back to show you how I made it.


I found this project on the Scor-Pal site. She used 12" x 12" cardstock, but I only had 8 1/2" x 11", so I adapted it. 

These are the supplies you will need:
Cardstock cut to the following dimensions:
1 - 6" x 11"
1 - 6" x 8"
2 - 4" x 8 1/2"
8 - 6" x 3 5/8"
I also used 2 - 3 7/8" x 6" to reinforce the top and bottom

1 sheet of patterned paper
magnets
Scor-Pal
Scor-Tape

Decorations and embellishments - I used Shabby Chic dies by Sara Davies Cardmaking & Papercraft magazine for the front scalloped decoration, and the Altenew Layered Daffodil die collection for the daffodils on top.


With your Scor-Pal, on the 6" x 11" piece score at 4" and 8". On the 6" x 8", score at 2" and 6".

On one of the 2" sides, make a mark at 1", add tape, and attach the 3" side to the tape. This gives you one long piece that measures 6" x 18".

On each of the two 4" x 8 1/2" pieces, score at every half inch but you want to alternate the scores as you are making mountains and valley folds. Score at 1/2", 1 1/2 ", 2 1/2", 3 1/2" etc. across the cardstock. Flip the cardstock from top to bottom, keeping the left edge in the same orientation. Score at 1", 2", 3". 4" etc. across the cardstock. Look for the first indentation, fold so the indentation is on the OUTSIDE of the fold, bump on the inside. Accordion pleat both pieces.


Using Scor-Tape, tape the bottom of each accordion piece to the third section on the long piece of cardstock. 


Add Scor-Tape to the sides to attach the dividers. I think it easier to show a picture than try to explain!


Don't put the tape all the way to the top, as the dividers are only 3 3/4". The tape is actually too long in the picture. I had to remove a bit when I attached the dividers. Add the dividers one at a time to make sure that they are lined up on each side. Then attach the last accordion flap to the front of the box. I found that the dividers curved quite a bit when empty, but straighten out some when you fill the spaces.


I added the patterned paper after I made this, but you could add it before you add the dividers. Also, because I used a die to make the decoration on the front flap, I die cut it from a smaller piece of cardstock and added it to the front flap. I used an old fridge magnet - the thin ones from company advertising - and cut it up. I held it in place before I attached it to make sure it would hold through the cardstock. I added one piece to the inside of the front flap and added the other to the inside of the front.


We would love to see your creations. You still have 2 weeks to enter, and all you have to do is have more than one score, and tell us where you used your Scor-Pal on your project. You could win a $25 gift certificate to the Scor-Pal storeThere are lots of projects on the Scor-Pal site if you would like some inspiration. Scroll down to the bottom and click on Project Listings.
Monday, 9 March 2020

Toned Down Neon

I decided to make another card for the Mod Squad Challenge - Bring on the Neon. We need to use neon or bright colours. I thought I would tone this one down a bit from the last one I made!


I used alcohol markers to colour my image. They don't show up quite as bright as my last card, but I think they are still vibrant.

I stamped the image and the sentiment on a piece of white cardstock. After colouring the image, I die cut it and also used the same die to cut it out of a piece of black cardstock. I taped the white cardstock to a white card base and filled in the hole with the die cut out of the black cardstock. Then I taped the black cardstock to the piece of white cardstock and fit the die cut image into the hole. If I haven't confused you by now, you get bonus points! Basically, I wanted the black layer to be smooth, so I had to cut a hole for it to fit into.

I coloured a few rhinestones with the same alcohol markers that I used for the flowers and added them to the card.

I used the following supplies:
Gina K. Designs Your Own Kind of Beautiful stamp set and die
              Jet Black Amalgam ink
Spectrum Noir alcohol markers FL2, FL3, BP6, AG2, GB6
              Ultra Smooth Premium White cardstock

Sunday, 8 March 2020

You Brighten My Day

This week on the Mod Squad Challenge, we are to Bring on the Neon. We have to use neon or very bright colours on our project.


I don't have any neon ink, but I thought these alcohol markers were pretty bright. I coloured with the markers through a stencil to make the background. I layered it with black and added it to a white card base.

I used the dies to cut out the flowers and leaves, coloured them with the markers and stamped the details in black, using my MISTI. Using foam tape, I attached them to a black die cut oval.

For the sentiment, I stamped it in VersaMark and heat embossed it in white. I attached this with some more foam tape.

I used the following supplies:
Gina K. Designs Electro Pop Flowers stamp sets and coordinating dies
             Sassy Stripes stencil
             Jet Black Amalgam ink
Spectrum Noir alcohol markers: FL2, FL3, BP4, AG2
             Ultra Smooth Premium White cardstock
VersaMark ink
Spellbinders Nestabilities Big Scalloped Ovals Small die

MISTI

Sunday, 1 March 2020

Daffodil File Folder Box


It's time for a new challenge on the Scor-Pal site! This month, the theme is Spring/ Easter, or Anything Goes. To enter, make a project that has More Than One Score, and tell us where you used your Scor-Pal.

This month, I made a Daffodil File Folder Box. I love seeing the first flowers of the Spring, poking through the ground, and often the snow! One of my favourites are daffodils, and since the deer don't like them, I have some planted in my front garden.


You can store many things in the box - stamped images, scraps of patterned paper or cardstock, or anything else that is fairly flat. I have some die cuts that I had in a large box, but kept forgetting to use. I thought if I put them in here, then I would see them and use them. I think I will add some tabs to the dividers and I can mark which shape is in each section.


To see a detailed description of how I made the box, come back on the 15th!