Tuesday, 31 May 2016

Splash of Colour

This card was made for the StampTV MIUM challenge - Black & White with a Pop of Color. I am also entering it in the Simon Says Stamp Wednesday Challenge - Anything Goes.


I didn't have much time to make a card so it had to be quick! I stamped the image and decided to only colour one of the flowers. Sort of like the spotlight effect. I stamped the sentiment, layered it onto a black mat and then onto a white card base.

I used these supplies:

Gina K. Designs: Sending Love stamp set
                             White and Black cardstock
Memento Tuxedo Black ink
Spectrum Noir markers - PL1, PL2, PL3, CT1

Sunday, 29 May 2016

Take 3

This is a card for the new release on StampTV- Take 3. We had to use 3 different ink colors, not including black or white.


I decided to use the shopping bags stamp and used masking paper to get the three bags in three different colors. The masking is tricky, since there are 2 bags on the stamp. I had to try more than once! Once I had the bags stamped, the rest was very quick.

I added the sentiment and the ribbon and then matted it before I put it on the card base.

I used the following products:
Gina K. Designs: Art From the Heart stamp set
                             Applemint, Lipstick and Blue Lagoon ink
                            White and Blue Lagoon card stock
VersaFine Onyx Black ink
Inkadinkado masking paper
Ribbon from my stash


Thursday, 26 May 2016

Rainbow Feather

I made a card for two challenges this week. I am entering the StampTV MIUM challenge - The Colors of the Rainbow and the Mod Squad Blog challenge - Use it or Lose it. We had to look through our supplies and use something that had been there for a long time that we hadn't used before, or hadn't used in a while. I found a feather die that came with a magazine that I bought. Unfortunately, it has been so long that I don't remember which magazine and I didn't write it on the package.
I am also entering the Simon Says Wednesday challenge - Anything Goes.


I decided to use the rainbow colors in my die cut so I used washi tape to cover a piece of cardstock and then die cut the feather. I added the totally perfect sentiment, that I also hadn't used before (but that doesn't count since I just got it!).

I went with the idea of the feather being the only color on the card, so I did everything else in black and white. I embossed a piece of white cardstock, die cut a black border and adhered everything to a black mat which I attached to the white card base. 

These are the supplies I used:

Gina K. Designs: Art from the Heart stamp set
                             White and black cardstock
VersaFine Onyx Black ink
Hot Off the Press feather die
Sizzix/Stampin' Up! Adorning Accents Edgelits die
Cuttlebug Moroccan Screen embossing folder
Washi tape from my stash

Friday, 20 May 2016

One layer male birthday card

My card this week is for two challenges: StampTV MIUM - Cards for Men and Mod Squad Blog - One Layer Birthday. I made a one layer male birthday card.


I love the way this frame stamp looks like different layers when you colour in the borders. I stamped the frame stamp on my white card base and coloured in the borders. I stamped the straight circle lines at the top and bottom and filled them in by stamping the filler circles. I stamped the belly bands in the matching pattern and stamped the sentiment in the oval.

I used the following products:

Gina K. Designs Fabulous Frame and Fabulous Holiday Fillers stamp sets
Stampin' Up! Early Espresso and Cajun Craze ink
Rose Art markers

Friday, 13 May 2016

Retiform card

This week I am combining two challenges:  StampTV MIUM Cash Card challenge and Mod Squad Blog Retiform Technique challenge. I decided to make a Father's Day card.


I started with a piece of white cardstock and scored and folded it to make my cash card base. On the front I used post-it notes to mask off portions of the cardstock and sponged with ink. I kept repeating this until the entire front of the card was coloured. 

When I was picking the stamps to use, I realized that I don't have many masculine images. So I made do with what I had from several different stamp sets. I masked off the different segments and stamped the images and sentiment. 

I taped the flap on the inside (for the money) with strong tape so it would hold.

I used these products:

Gina K. Designs: Stamp sets: Art from the Heart, Better with You, Made with Love, Fabulous                                              Holiday Fillers, Happy Birthday to You, Birthday Blessings
                             Ink: Blue Lagoon and Prickly Pear
                             White card stock
VersaFine Onyx Black ink
Sookwang tape

Sunday, 8 May 2016

Picture Perfect

For the StampTV MIUM challenge this week, Picture Perfect, we were given this picture to use as our inspiration.


Here is what I came up with:


I am also entering this in the Mod Squad Blog challenge - use flowers. 

I used slightly different colours, as that's what I had. I used a pink cardbase and randomly stamped images from several stamp sets in different colours on the front of the card. I added a few highlights with a white pen.

I used one of the foilable elements from the Sending Love StampTV kit and foiled it in gold. I die cut the black mat and hand cut the prickly pear mat. I adhered all the layers together and attached it to the card.

I used the following products:

Gina K. Designs: Stamp sets: Sending Love, Made with Love and Birthday Blessings
                             Ink: Prickly Pear, Wild Lilac, Lipstick and Grass Green
                             Foiling element from the Sending Love StampTV kit
                             Cardstock: Black and Prickly Pear
Heidi Swapp Minc foil: Gold
Spellbinders Nestibilities Big Scalloped Circles Large Die
Ranger White Opaque pen
2" punch


Monday, 2 May 2016

Mother's Day card

This week I have a Mother's Day card that I made for the Mod Squad Blog challenge - Mother's Day. I am also entering it in the Simon Says Stamp Wednesday challenge - Anything Goes.


One of the sponsors on the Mod Squad Blog is Sparkle N Sprinkle so I decided to use one of the digital stamps I have from them. It is called Sweet Pea and is a large image so I decided to use it as my focal image.

I printed out the image and coloured it using Spectrum Noir alcohol markers. I wrote the sentiment with a Silhouette sketch pen, die cut it and coloured around the edge with marker PP4. I wrapped a piece of ribbon around the image layer, matted it with some pink cardstock and adhered it to a white card base. I popped up the sentiment with some foam squares.

I used the following supplies:
Sparkle N Sprinkle digital stamp - Sweet Pea
Spectrum Noir alcohol markers: LG2, LG3, LG5, PP1, PP2, PP4
Tim Holtz/ Sizzix die from the Celebrate set
Spectrum Noir Ultra Smooth Premium White cardstock
Silhouette sketch pen - Copper
pink cardstock, ribbon, foam squares from my stash

Friday, 29 April 2016

Recycled Card

The StampTV MIUM challenge this week is an interesting one. We have to Get Trashy! We have to take something that we would normally throw out and use it on our card. I decided to use an empty toilet paper roll to make a gift card holder. I am also entering this in the Simon Says Stamp Wednesday challenge - Anything Goes.


I flattened the toilet paper roll and creased the edges well with my bone folder. I used some Sookwang tape to seal one end of the roll. I cut a piece of patterned paper and adhered it. I stamped the sentiment on a punched circle, matted it with a punched scalloped circle which was sponged around the edge and popped it up with some foam dots. For the insert, I used the tag punch on a strip of cardstock, sponged the edge and threaded it with some baker's twine. The gift card can be attached to the insert with a glue dot.

For the card base I used Versamark ink and stamped the flourish randomly. I attached the gift card holder and thought it needed something else, so I added a few rhinestones.

Here are the products I used:

Gina K. Designs: A Gift for You and Made with Love stamp sets
                             Made with Love patterned paper
                             Prickly Pear ink
ek tools 1 1/2" circle punch, 1 3/4" scalloped circle punch and tag punch
Memento Tuxedo Black ink
Versamark ink
Sookwang tape
Hampton Art adhesive foam dots
toilet paper roll, baker's twine and rhinestones from my stash

Sunday, 24 April 2016

Emboss resist card

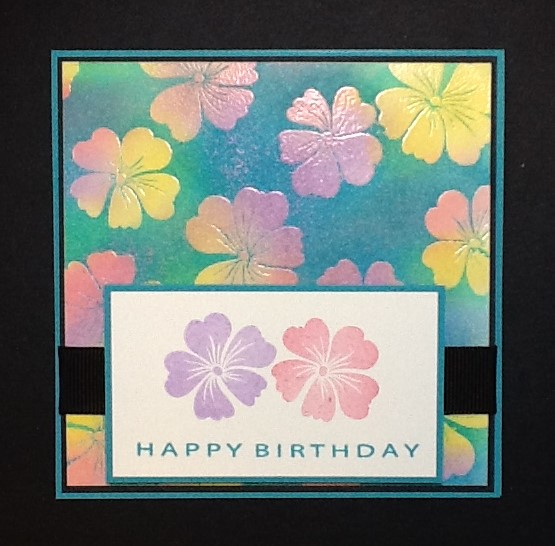
I am combining two challenges for this card. For the StampTV MIUM challenge we had to make a card that was a different size than 4 1/4" x 5 1/2". I chose a 4 1/4" square card. The other challenge I made the card for is the StampTV Kit Friday Funday challenge. We had to pick a video from StampTV that had one of our favourite techniques and make a card with that technique. I chose the Color on Color Emboss Resist video by Gina. You can see it here. I am also entering the Simon Says Stamp Wednesday challenge - Make it Girlie.


I started with a white piece of cardstock and sponged yellow, pink and purple ink randomly over the piece. I stamped the flowers with VersaMark ink and heat embossed them. Then I sponged blue ink over the entire area. I love that when you rub off the ink from the flowers the colours underneath show through. I matted it with black, added a piece of ribbon, and attached it to a blue card base.

I stamped two flowers onto a small piece of white cardstock and added the sentiment. I matted this with blue and popped it up with foam squares. 

I used the following products:

Gina K. Designs: Made with Love and Happy Birthday to You stamp sets
                             White, Black and Blue Lagoon cardstock
                             5/8" Black ribbon
ColorBox Pigment ink: Yellow, Pink, Purple
VersaMark ink
Recollections Clear embossing powder
foam squares from my stash


Friday, 15 April 2016

Negative and Positive

This week on the Mod Squad Blog, we are asked to use a die cut and have both the negative and positive cuts on our card. I am also entering this in the new StampTV Release Party Challenge where we are asked to divide a panel on our card into separate pieces.


I was thinking about the positive and negative challenge and then when the Release Party challenge was to divide a panel into pieces, I thought of this technique. I forgot how many little pieces are in this die when I picked it out to use!

I die cut half of the butterfly from the black cardstock and carefully removed all of the little pieces. I taped the cardstock onto a piece of white cardstock, lining it up about halfway across. I laid the die cut back in the hole and used this as a template to place the little pieces back in position. I then flipped the die cut over, ran it through my Xyron machine to put adhesive on the back and adhered it on the white side, matching it up with the negative side. I matted this layer and adhered it to the card base with some foam squares.

I stamped the sentiment, die cut and matted it, and adhered it below the butterfly image.

Here are the products I used:

Gina K. Designs: Birthday Blessings stamp set; Black, White and Sweet Mango cardstock
Die-Versions 'Butterfly Kisses' Whispers die
Sizzix/ Tim Holtz Celebrate die
VersaFine Onyx Black ink
Xyron Create a Sticker machine
Zig 2 way glue pen
Tombow Mono Adhesive
Foam Squares from my stash