Wednesday, 28 April 2021

Die-Cut Sentiment

I decided to get another Christmas card made, and I'm entering it in the Gina K. Designs Monthly Mix Challenge - Die-Cut Sentiments.


Unless otherwise indicated, all supplies are from Gina K. Designs.

I used the Wishing You Joy Stamp n Stencil snowflake stencil with Silver Glitz Glitter Gel. Once that dried, I scored two lines under the snowflakes, using my Scor-Buddy.

The sentiment is from the Seasonal Sentiments stamp and die set. Merry was stamped with Tranquil Teal ink, and Christmas was cut from Tranquil Teal cardstock. 

Once I had layered the panel with Tranquil Teal and adhereded to a white card base, I thought it needed a little something by the sentiment. I added a few dots of Silver Stickles. 

Tuesday, 20 April 2021

Perfectly Pantone

 I needed to make a birthday card, so I used yellow and gray, the Pantone colours for 2021. I am entering this in the Mod Squad Challenge - Perfectly Pantone.


I tried doing a technique that Gina K. showed us on her Stamp and Chat, but it didn't work too well. I think I needed darker cardstock for the background, but I didn't have any gray. It is supposed to give the pattern a recessed or raised look. I still think it's a nice background, even though it didn't really work.

The stencil I used is called Ornamental Fans, by Gina K. Designs, and the cardstock is Gina K. Designs Wild Dandelion. I first used white pigment ink, let it dry, then shifted the stencil over a bit and up a bit before adding Gina K. Designs Slate ink. I attached this to a white card base.

I stamped the sentiment, from the Gina K. Designs Birthday Blessings stamp set, with Slate ink, then embossed it with clear embossing powder. It makes it a bit darker and gives it a bit of shine. I cut it out, added it to a white die cut and used some foam tape to attach it.

Friday, 9 April 2021

Slimline Christmas Card

This month, the Gina K. Designs Monthly Mix Challenge is Die Cut Sentiments. The only Gina K. sentiment dies that I have are Christmas and Hanukkah, so I made a Christmas card.


Gina K. showed how to make a swirl design on an A2 size card, using the wreath builder template with a square piece of cardstock, and then cutting the wreath and attaching it to the ends of the card. I wanted to try stamping the whole design on a slimline card, so I used the Memory MISTI with the wreath builder template so the cardstock would fit.

My cardstock wasn't square, so I made a small pencil mark on one corner and made sure that the marked corner was always against the template. Once I had the pattern on one end, I repeated it at the other end.

I used the following supplies:

Gina K. Designs: Christmas Greenery, Holiday Frame, and Seasonal Sentiments stamp sets
                             Coordinating dies from Seasonal Sentiments
                             Lucky Clover, Christmas Pine, Red Hot, Warm Cocoa, Red Velvet ink
                             Red Velvet, White Cardstock
                             
Wreath Builder template
                             Connect Glue
Memory MISTI
Holiday Mix embellishments by Pretty Pink Posh
Picket Fence Studio Slim Line die cutting system

Thursday, 8 April 2021

Yellow and Gray

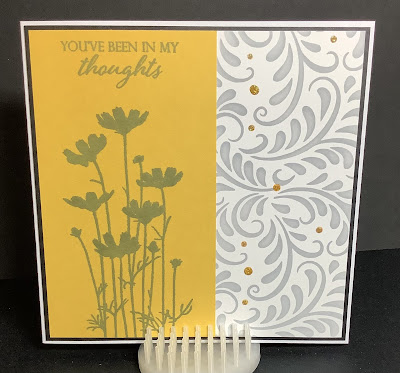
The Mod Squad Challenge this week is called Perfectly Pantone. The 2021 colors from the Pantone Color Institute are Yellow and Gray, so we are to use only yellow and gray on our card. We can also use white and black, if we wish.


All of my supplies are by Gina K. Designs, except the Stickles.

I blended Soft Stone ink through the Harvest Flourish stencil onto a piece of white cardstock. The sentiment and flowers are from the Autumn Silhouettes stamp set, and are stamped with Soft Stone ink onto Wild Dandelion cardstock.

I attached these onto a piece of black cardstock, since I realized that I didn't have any gray cardstock! This was then added to a white card base. To add a bit of sparkle, I used some yellow Stickles on the dots in the stencil design. 
   

Thursday, 1 April 2021

Scor-Pal More Than One Score - April


It's time for the April Scor-Pal More Than One Score Challenge. This month, the theme is April Showers, or April Fool Us (use a hidden/surprise element), or you can make an Anything Goes project as long as it follows the general rules.

Each month we will have a different theme and you will have a month to create and enter your projects. As well as the theme you will need to make "More Than One Score" and tell us where you used the Scor-Pal on your project. So a single fold card won't count but an Easel, Gatefold, Stair Step, etc will :) Also we love to see your "Anything But a Card" projects, just as long as you make "More Than One Score".

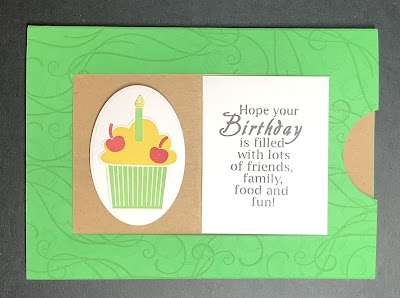
I made a Hidden Image card this month. This is what it looks like closed.


And this is what it looks like after the tab is pulled, revealing the hidden image.


To make this card, you will need:

5 1/2" x 8 1/2" piece of cardstock for the card base (I used green)
3 3/4" x 4 3/4" piece of cardstock for the sliding tab (I used kraft)
2 1/2" x 4" piece of cardstock for your images (I used Spectrum Noir Ultra Smooth Premium White Cardstock)
The Stacker - Well, I guess you don't need this, but it makes it so easy to add your Scor-Tape!

Score the green piece at 4" and 8". Make 2 slits from 3/4" from the top down to 4 3/4" at 4 3/4" and 7 1/4". Cut the kraft piece at 2" almost down to the bottom. I left about 1/2" attached. Your pieces should look something like this:


You can decorate your card base, if you like. I first stamped a circle design (from an unknown company), with ColorBox Fresh Green ink, but I found it didn't show up, so then I used the flourish from the Gina K. Designs Layered Daisies stamp set, and stamped it with Gina's Lucky Clover ink.

On the white piece of cardstock, stamp your two images. The hidden image will be on the left. I used a balloon stamp that I have had for years, but don't know who made it. I used Spectrum Noir alcohol markers AG2, AG4, DR3, DR5, CT1, CT3 to colour the balloons, and added some Clear Wink of Stella on the highlights. The sentiment on the right is from the Stampendous Birthday Assortment stamp set. I used Memento Tuxedo Black ink for these.

Attach the white piece between the two slits with Scor-Tape. Punch a half circle on the edge, so it's easy to pull the tab. I used a 1 1/2” circle punch, but you can use whatever size you have.


From the back, thread the 2" flap of the kraft piece through one slit and back through the other slit. I actually took this picture before I had taped on the white piece, and realized that it was much easier to put the white piece on first. 


Turn it over and tape the 2" flap back to the rest of the kraft piece. Add a piece of Scor-Tape along the 1/2" tab, fold the back of the card up, and fold the tab down on the outside. This way, it doesn't interfere with the slider.


Now you can decorate the front of the sliding tab. I used the Stampin’ Up! Create a Cupcake stamp set
with Gina K. Designs Lucky Clover, Wild Dandelion, and Cherry Red ink, and the Cupcake Builder punch to punch it out. I attached it with some Forever in Time foam squares.

We would love to see your creations, and you might win a gift certificate to the Scor-Pal store!