Thursday, 31 August 2023

More Smakin' Acetate

 I decided to make another card for the Gina K Designs August 2023 Monthly Mix Challenge - Smakin' Acetate. This time, I used re-inkers to make the background.


I dripped some Prickly Pear, Jelly Bean Green and Fresh Asparagus re-inkers onto the acetate, spritzed it with water and placed the cardstock on top. Then I lifted the cardstock off and let it dry. 

I wasn't sure if I liked the design that it made, but I decided to continue and see what it looked like at the end.

I first stamped the leaves, from the Skeleton Leaves stamp set, with Warm Glow Amalgam ink. It looked okay when it was wet, but by the time it dried, it almost disappeared. So, I tried to line up the stamps in the same position and restamped with Warm Cocoa ink. I didn't get them all lined up, but it gave a nice shadow image that I like. I layered it with some brown cardstock and attached it to a white card base.

The sentiment came from the So Many Sentiments stamp set, and was stamped with Warm Cocoa ink. I layered it with some brown cardstock and placed it at an angle. 

I was really happy with the finished card and I'm so glad that I didn't give up on it!


Tuesday, 29 August 2023

Smakin' Acetate

The Gina K. Designs August 2023 Monthly Mix Challenge is Smakin' Acetate. We are to make a background using this technique. 


Smakin' Acetate can be made with markers, stamp pads or re-inkers. You place some colour on a piece of acetate, spritz some water on it, and lay your cardstock down on top. When you lift up the cardstock, the colour will have transferred to it. 

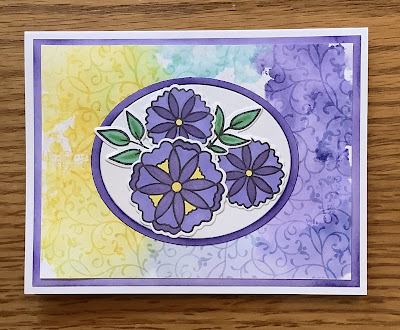
I used Wild Dandelion, Turquoise Sea, and Dark Lilac ink cubes to make my background. I wasn't too sure about the results - it looked like a hot mess to me, but I thought if I stamped and embossed a background stamp on top, it might look better. I used the Petite Flourish background stamp, VersaMark ink, and clear embossing powder, and I was happy with the result.

The flowers and leaves, from the Stained Glass Flowers stamp set, were stamped with Obsidian Amalgam ink and coloured with Spectrum Noir alcohol markers.

I layered the pieces with cardstock which had some Dark Lilac ink blended on the edges.

The inks and stamps are from Gina K. Designs.

Friday, 11 August 2023

Layered Butterfly

 This month, the Penguin Palace Challenge is a Sketch Challenge.


Here's what I came up with.


I used the Penguin Palace Butterfly Emergence 2 in 1 layered dies for the butterfly. It is such an easy way to get the different colours and dimension on the butterfly. 

For the panel, I used the Sacred Lotus Stencils 360°, and inked it up with Gina K. Designs Lemon Drop, Blue Lagoon and Wild Lilac ink. I used the ink left over on my blending brush to add a bit of colour on the edges of the panel. 

I added a strip of the purple cardstock that I used in the butterfly, and popped up the butterfly with some foam squares.

Tuesday, 1 August 2023

August Scor-Pal More Than One Score


It's time for another Scor-Pal More Than One Score project! This month, I made an 8 pocket mini album with a 12" x 12" sheet of cardstock. 


To make this, you will need: 

12" x 12" sheet of cardstock
Cardstock for the spine covering, 3" x 1 1/4"
Cardstock to make the tags 
Patterned paper for decorating - I used a small paper pack by Paula Deen, and cut 8 pieces 2 7/8" square, and cut out a design for the front


Start with the 12" x 12" piece of cardstock and score at 3", 6", and 9". Rotate 90 degrees and repeat. Cut along the first score line on the left, starting at the bottom, up to the 3" score line. Repeat for the score line on the right. For the score line in the middle, start at the top and cut down to the 9" score line. You will end up with an M shape. Starting from the bottom left, fold the first section under, making a mountain fold, and then fold the second section on top of the third section, making a valley fold. Repeat along the cardstock, alternating mountain and valley folds. Unfold it and add Scor-Tape as shown in the picture. After I had mine assembled, I realized there should be tape on one more section. I'll describe that later.


Flip the cardstock over, so you have a W shape, and apply Scor-Tape as shown.


Flip it back to the M shape, and fold it back up, keeping the bottom left section on top. Position it so it looks like the picture below. The flap on the right will be the front cover, once it's taped in place. I found it easier to add my patterned paper now, before I taped it all together. There will be 4 pages that open fully, and you add paper to each side. To make it easier to remove the tags from the pockets, I used a 1" circle punch and punched a half circle on the top of each page with the patterned paper.


Starting from the front, as shown above, remove the release paper from the Scor-Tape and fold the section over to adhere. Open it back up to the right, and tape the next page, repeating to the end. There will be a couple more that open from the top. Then there will be the one that is not in the picture at the beginning. it is in the middle of the album, and opens from the bottom. Place tape as shown in the picture below, and attach the two sides together.


Here are my decorated pages.


I used the Stampin' Up! Scalloped Tag Topper punch for the tops of my tags. For the spine covering, with the short end at the top, score every 1/8" along the piece of cardstock, and slightly curve the middle section along the score lines. Add Scor-Tape along the two edges, center it on your album to determine placement, and then remove the backing paper and adhere it. You don't want to tape down the center of the spine, as it needs some room to move when the album is opened. 


Add your tags into the 8 pockets, and your album is finished. 


I hope I have explained this well enough for you to follow. If you have any questions, please leave a comment!