Saturday, 29 July 2023

Christmas Ornaments

 I have another card for the Gina K. Designs & Stamp TV Friends Facebook group challenge - Christmas in July.


I used the Gina K. Designs (GKD) Deck the Halls stamp set, and stamped the ornaments with GKD Cherry Red ink. Then I embossed the decorations and the tops and strings of the ornaments in gold. The sentiment was stamped with GKD Obsidian Amalgam ink.

I adhered this layer to a gold foil cardstock layer, and then attached it to a white card base.

It's a fairly simple design, dressed up with a bit of gold!

Friday, 28 July 2023

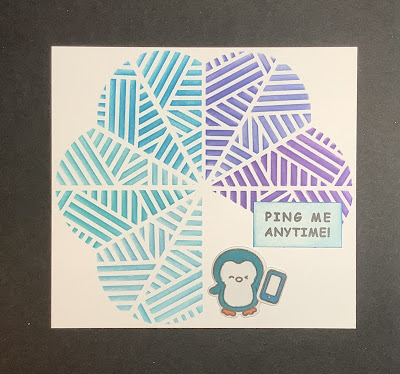
Ping me Anytime

This month, the Penguin Palace Challenge Blog has an Image and Colour Palette Inspiration for us.


Here's what I came up with.


I used the Penguin Palace Kaleidoscope Stencils 360° for the background. The colours are from Gina K. Designs: Ocean Mist, Blue Lagoon, Blue Raspberry, Medium Lilac, Wild Lilac ink.

Since there were 5 colours in the Inspiration Palette, I left one part of the stencil design blank, and added the cute penguin using his cellphone! They're from the Penguin Palace Penguin Agenda stamp set and coordinating dies and were stamped with Gina K. Designs Obsidian Amalgam ink and coloured with Spectrum Noir alcohol markers.

The sentiment was also from this set and after I had stamped and cut it out, I added a bit of the ink that was on my blending brush. I added this panel onto a white card base.

Monday, 24 July 2023

Precious Poinsettia

 The theme for this month's Gina K Designs Monthly Mix challenge is Christmas in July, so I came up with this Christmas card.


The large poinsettia, from the Precious Poinsettia stamp set, is a multi stamp image, so you can stamp the outline and then fill it in with different colours. I used Red Velvet and Lucky Clover ink. I was debating whether to cut out the image when I dropped my red ink cube on it, so that made my decision for me! 

I used the Tapestry embossing folder for the background, added the poinsettia, and then popped up the sentiment, from the same stamp set, which was stamped with Obsidian Amalgam ink.

All the supplies are from Gina K. Designs.


Saturday, 1 July 2023

July Scor-Pal More Than One Score


Happy Canada Day to all my Canadian friends!  Happy 4th of July in a few days to my American friends! It's time for another Scor-Pal project with More Than One Score!

This month, I made a card with a kite fold design in the middle.


To make this card, you will need:
8 square pieces of patterned paper
cardstock for the card base and behind the folded design
background to coordinate with the design

I used a die to cut out my squares, but you can use a punch, or cut them with a paper trimmer. My squares measure 1 1/4", and my card base is 4 1/4" square, so that gives you some idea of the finished size. 

For each square, line it up on the diagonal on one of the Scor Buddy's inch grooves. You can see in the picture that the bottom of the grooves for the inches are marked, making it easy to line up. Score down the groove.


Once you have all the pieces scored, fold in each corner to meet up with the score line. It will look like a kite shape.


Repeat with all 8 squares.


For the cardstock behind the design, cut it slightly larger than twice the size of your squares. My squares are 1 1/4", so my pieces are 2 5/8". To line up your pieces, on the back of one piece draw a line along the diagonals, and on the other piece mark the midpoint of each side and draw a line connecting the opposite sides.


Then, add your Scor-Tape and place one piece on top of the other one, lining up the drawn lines.


Turn the piece over and add your kite pieces. I laid all the pieces on first, to make sure they lined up, and then I took the release paper off the Scor-Tape and taped them down.

For my card background, I used a technique I saw on Jennifer McGuire's YouTube channel. You add white pigment ink to the raised side of an embossing folder, add your cardstock and run it through your embossing machine. I had some of the white ink transfer where I didn't want it, so I rubbed a matching coloured ink pad over the top of the cardstock. Since the white ink is debossed in the design, it doesn't get coloured.


Try two or more colours for your squares for a different look.


Fun with Rubber Bands

The challenge for June on the Gina K Designs and Stamp TV Friends Facebook page is to make a card using rubber bands. 


For my first card, I wrapped rubber bands around an acrylic block, and inked up the rubber bands like a stamp, using Light Orchid and Wild Dandelion ink, to make a plaid design. 

I cut my panel on an angle, and attached the two pieces to a white card base. I stamped the sentiment, from the  Sketched Flowers stamp set, with Dark Orchid ink in between the background pieces.

I added the flower and leaves, also from the Sketched Flowers stamp set, and cut out with the  coordinating dies. I used Dark Orchid, Wild Dandelion, and Lucky Clover ink.

All of the supplies are from Gina K. Designs.


For this card, I wrapped rubber bands around a brayer, inked them up, and rolled them onto the cardstock, using Applemint and Blue Lagoon ink. 

The sentiment is from the Little Thoughts stamp set, and stamped with Obsidian Amalgam ink.

I used Applemint cardstock for the layers and cut all the pieces with Master Layouts 3. 

All the supplies are from Gina K. Designs.