Monday, 13 September 2021

Snowflake Slimline

 I saw a video by Jennifer McGuire that showed this design, and I thought I would make a slimline version.


This card uses a partial die cutting technique for the snowflake, so it shows when the card is closed and open.


I am entering this in the Mod Squad Challenge - Slim is IN.

I used the following supplies:
Gina K. Designs: Sparkling Snowflake stamp set and coordinating die
                             
Harvest Flourish stencil
                             Cherry Red ink
                             Red Velvet cardstock
VersaMark ink
gold embossing powder, gold foil cardstock

Tuesday, 7 September 2021

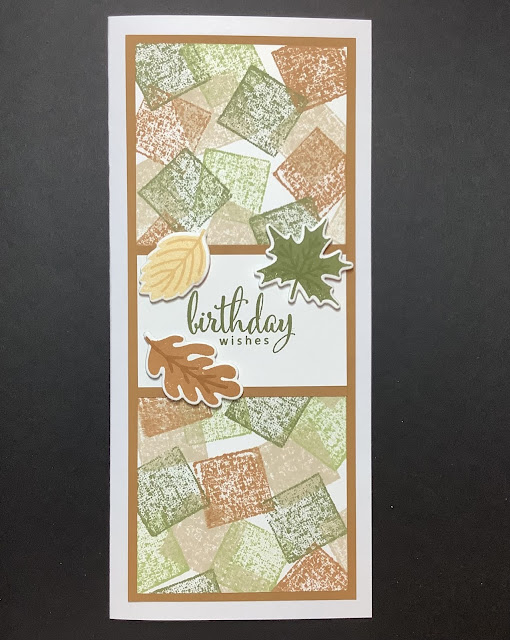
Ink Cube Background

I needed another birthday card, so I decided to make another slimline card with an ink cube background. This time, it's a regular size slimline card, and I 'stamped' the ink cubes onto the cardstock.


I am entering this in the Gina K. Designs Monthly Mix Challenge (use ink cubes direct to paper to make the background), and the Mod Squad Challenge - Slim is IN (make a slimline card, either regular size or mini).

All the products I used are by Gina K. Designs.

I used Sandy Beach, Honey Mustard, Jelly Bean Green, and Fresh Asparagus ink cubes for the background. The sentiment, stamped in Fresh Asparagus, is from the Wrapped in Love stamp set.

I used Honey Mustard cardstock to mat the layers and attached them to a white card base.

The leaves are from the Autumn Wishes Stamp n Stencil stamp set and I used the coordinating dies to cut them out. They are stamped in Sweet Corn, Honey Mustard and Fresh Asparagus, and popped up with some foam squares.


Monday, 6 September 2021

Swiped Ink Cube Background

 This month, the Gina K. Designs Monthly Mix challenge is to use Ink Cubes to make your background. The Mod Squad challenge  - Slim is In is to make a slimline card. I combined the two challenges to make this card.


I used several colours of Gina K. Designs ink (Sea Glass, Ocean Mist, Turquoise Sea and Tranquil Teal) and swiped the ink cubes over the cardstock several times. When I was finished, I thought it looked like water and sky so I used the Gina K. Designs Time to Coast stamp set to add the boat, birds and sentiment, using Gina K. Designs Jet Black Amalgam ink.

I added this layer to a white card base and the card was finished! This was a fun and easy way to make a background.

Wednesday, 1 September 2021

September Scor-Pal More Than One Score


Can you believe that it is September already? That means it's time for another Scor-Pal More Than One Score ChallengeThis month, the theme is School or Storage, or you can make an Anything Goes project as long as it follows the general rules.

Each month we will have a different theme and you will have a month to create and enter your projects. As well as the theme you will need to make "More Than One Score" and tell us where you used the Scor-Pal on your project. So a single fold card won't count but an Easel, Gatefold, Stair Step, etc, will :) Also we love to see your "Anything But a Card" projects, just as long as you make "More Than One Score".


I made a Tea Bag Storage Box.


To make this, you will need:
For the box: 
    Cardstock: 1 piece 8 3/4" x 12" 
                      1 piece 3 7/8” x 3 5/8” 
                       2 die cuts for the top and bottom
To decorate: 
    Coordinating cardstock: 2 pieces 2.75” x 5.5” (sides)
                                            1 piece 2.5” x 4.5” (front)
                                            1 piece 2.5” x 5.5” (back)
    Patterned paper: 2 pieces 2.25” x 5.25” (sides)
                               1  piece 2.25” x 4.25” (front)
                               1 piece 2.25” x 5.25” (back)
    Other embellishments, as desired


Starting with the 8 3/4" x 12" piece of cardstock, with the 12" side at the top, score at 3", 5 3/4", 8 3/4" and 11 1/2". Turn your cardstock 90 degrees to the right, and score at 3". Then score at 2 1/4" down to the first score line (at 3"). Skip a section, and continue from the second score line (6") to the bottom. Finally, score at 4" on the bottom two panels (from 9" to the bottom). You will end up with a piece that looks like this.


Cut off the bottom sections, as shown in the picture below. On the 3 7/8” x 3 5/8” piece, score at 1/2" on all sides, and cut along one side of each corner to make tabs. This will be the box lid. Crease along all the score lines.


Add Scor-Tape along the long tab and fold to make a box. Add more Scor-Tape along the bottom tabs and fold up the bottom flap. Tape and fold in the tabs to make the box top. The top will fit inside the main box. Add the die cuts to the box top and the bottom of the box.

Add the patterned paper with the coordinating cardstock pieces on the sides. These can also be attached before the box is taped together. If your patterned paper has items that have an up position, make sure it is attached in the right direction.

I added a smaller die cut on top and then attached a flower. On the front, I added a tea cup stamp, from Gina K. Designs Perfect Blend stamp set.


I hope you will join in the challenge this month. If you make a project with more than one score, you  might win a gift certificate to the Scor-Pal store!