Friday, 17 March 2023

Ink Cube Thumping

I have another birthday card to share. This one uses the Ink Cube Thumping technique on the bird.


I started with a gate fold card base, and stamped the Petite Flourish background stamp with Grass Green ink on the front.

For the bird, from the Birthday Blessings stamp set, I first inked it up with Blue Raspberry ink and then used my Blue Denim ink cube around the edges of the design. It gives a shaded effect and a bit of dimension.

The sentiment is also from the Birthday Blessings stamp set. I stamped it with Obsidian Amalgam ink, and cut it out with one of the dies in the Decorative Label die set. I used one of the other dies in the set to cut out the background piece for the bird. I blended some Blue Raspberry ink on it, cut out the bird with the coordinating die, and attached it and the sentiment. I adhered one side of this to the card front, so it can open.

All of my supplies are from Gina K. Designs.

Wednesday, 1 March 2023

March Scor-Pal More Than One Score


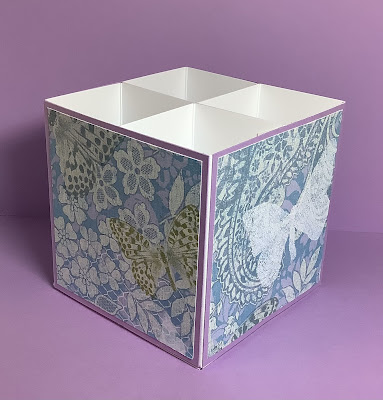
It's the beginning of a new month, so it's time for another Scor-Pal More Than One Score project. I recently received some new markers, so I made a box to store them in.


To keep the markers from falling over, I wanted some dividers in the box, so I thought the easiest way to do this was to make 4 small boxes and tape them together.

To make this box, you will need:

4 pieces of heavy cardstock, measuring 6" x 8 1/2"
1 piece of cardstock, measuring 4" x 4"

Patterned paper, cardstock to decorate

With the 8 1/2" side of one of the larger pieces of cardstock at the top of your Scor-Pal, score at 2", 4", 6" and 8". Turn the cardstock a quarter turn to the left, and score at 4". Trim the piece as shown below.


Fold along the score lines, and add Scor-Tape, as shown.


Make the box by attaching the tab to the other side, and then folding in the bottom flaps, making sure to fold the flap without tape last. I find the easiest way to attach the tab, is to fold in the first section with the tab, remove the tape liner, and then fold in the other side. Here's a picture to make it clearer!


Once you have the first box made, repeat with the other 3 pieces of cardstock. Tape the 4 boxes together to make a large box. The 4" x 4" piece can be taped to the bottom, to make it look neater and to make it a bit stronger.


Then you can decorate it. I used 4" x 4" pieces of cardstock, and 3 3/4" pieces of patterned paper to decorate mine.